Table of Contents
Introduction to vBond
This component is so important because it provides initial authentication for participation on the fabric and acts as the glue that discovers and brings all other components together. Multiple vBond servers can be deployed to achieve HA. WAN Edge pointed toward a single vBond, it is recommended to have the WAN Edge use DNS and have a single A record point to all vBond IPs. When the WAN Edge resolves the DNS record for the vBond controller, it will receive each IP address and try to connect to each one sequentially until a successful control connection is made.
This section will cover Cisco SDWAN deployment of the vBond controller. Here are steps to be performed:
Step 1. Deploy the virtual machine for vBond.
Step 2. Bootstrap and configure the vBond controller.
Step 3. Manually install the root CA certificate on vBond.
Step 4. Add the vBond controller to vManage.
Step 5. Generate and install the certificate onto the vBond controller.
Step 1/2/3: Deploy vBond Virtual Machine on VMware ESXi; Configure vBond Controller and Manually Install Root CA Certificate on vBond
Once the vBond virtual machine is deployed, power up the virtual machine.
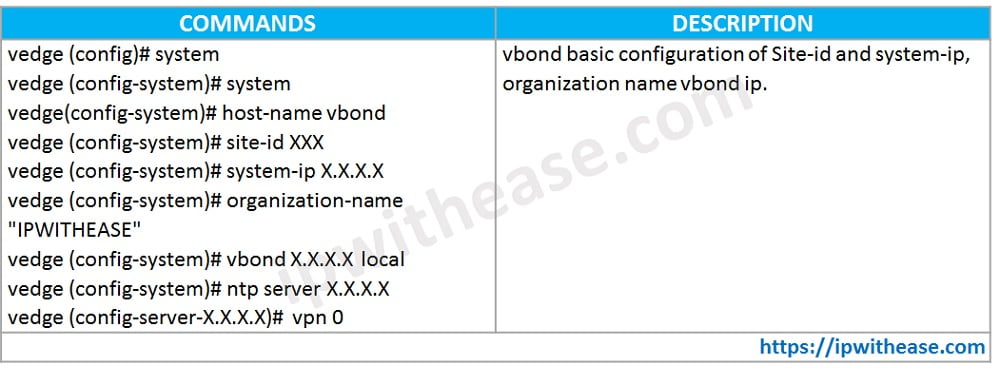
- Similar to the vManage controller, you need to apply a bootstrap configuration via the CLI. In this step you’ll set the organization name, site ID, system IP, VPN 0, and VPN 512 information. As with vManage, the first thing you’ll do on vBond is set the system information. To access this configuration mode, type config terminal or conf t. Once in configuration mode, to access the system context, execute the command system. Pay special attention to the vbond 209.165.200.226 local command. Remember that we’re using the vEdge Cloud image for the vBond. By specifying the local command, the vBond persona is enabled.
vBond Initial System Configuration
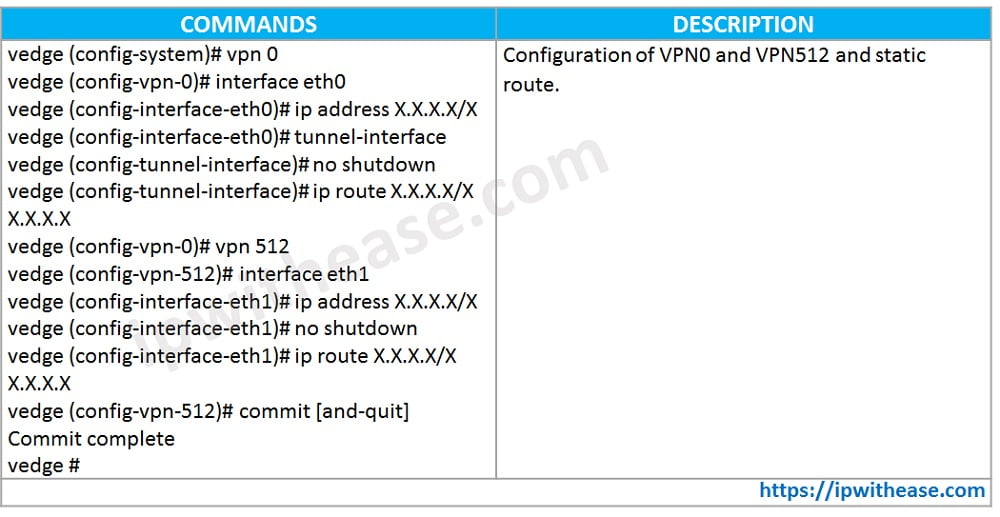
- Just like with the vManage controller, you need to provide some initial settings to the VPN 0 and VPN 512 interfaces. One difference from the vManage controller is that you need to remove the tunnel tunnel-interface command.
vBond VPN 0 and VPN 512 Configuration
- The last step to initially bootstrap the vBond controller is to install the root CA certificate. To complete this, you need to copy the root CA certificate to the vBond controller. This can be most easily accomplished with SCP (such as with Putty SCP or WinSCP). Simply use the SCP program of your choice to connect to the VPN 512 interface of vBond and copy the root certificate over. By default, the file is copied to the /home/admin directory on the vBond. Once copied, however, the certificate needs to be installed. This is accomplished via the request root-cert-chain install directory command.

Step 4/5: Add vBond Controller to vManage; Generate and Install Certificate onto vBond Controller
The remainder of vBond bootstrapping can be done via the vManage GUI. In these steps, the network administrator will be adding the vBond controller to the SD-WAN overlay (that is, updating the whitelist discussed previously). Most notably, this will consist of generating a CSR, signing the CSR, and installing the certificate.
- Adding the vBond to the controller whitelist is done via the vManage GUI. Once you’re logged in to the vManage GUI, browse to Configuration > Devices > Controllers (tab). From here, select Add Controller and select
- A dialog box will be displayed. From this screen, input the management IP (VPN 512) as well as the username and password. For this example, the default values are 168.1.11 and admin/admin. Click Add when finished. By leaving Generate CSR checked, a CSR will automatically be created. You should now see the vBond controller added to the vManage GUI.
- The final step is to generate the certificates that will be used for vBond controller authentication. Browse to the Devices > Certificates > Controllers screen in the GUI. Just like we did with vManage, we need to download and sign the CSR. To download the CSR, click the ellipsis to the far right for the respective controller and select View CSR. A dialog box will appear. From here, you can download the CSR and have the enterprise CA sign the request.
- From the Configuration tab > go to Devices > Certificates > and then Controllers we can now see that the vBond is in sync and vManage has learned additional values from the device (such as site ID and system IP). In this section, the vBond controller was deployed, bootstrapped, and configured and certificates were installed. The next section will cover deployment of the vSmart controller. The process for the vSmart controller is very similar to the vBond controller.
Continue Reading:
vManage Controller Deployment: Cisco SDWAN Deployment Guide
Cisco SD-WAN Template: Configuration & Deployment
ABOUT THE AUTHOR

You can learn more about her on her linkedin profile – Rashmi Bhardwaj

