Table of Contents
Many times networkers are faced with requirement of Static Public IP Address like when provisioning a Web Server, a lab with access over Internet or even when setting up an email server. In such scenarios, either a new Internet package needs to be bought which includes public IP addresses or else we buy new Static Public Address pool from provider.
However, starting cisco IOS 12.4 onwards, a protocol called DDNS (Dynamic DNS) can be configured on Cisco Routers which allows to update the DNS entry when the Router IP address changes – Hence Static IP address requirement is mitigated.
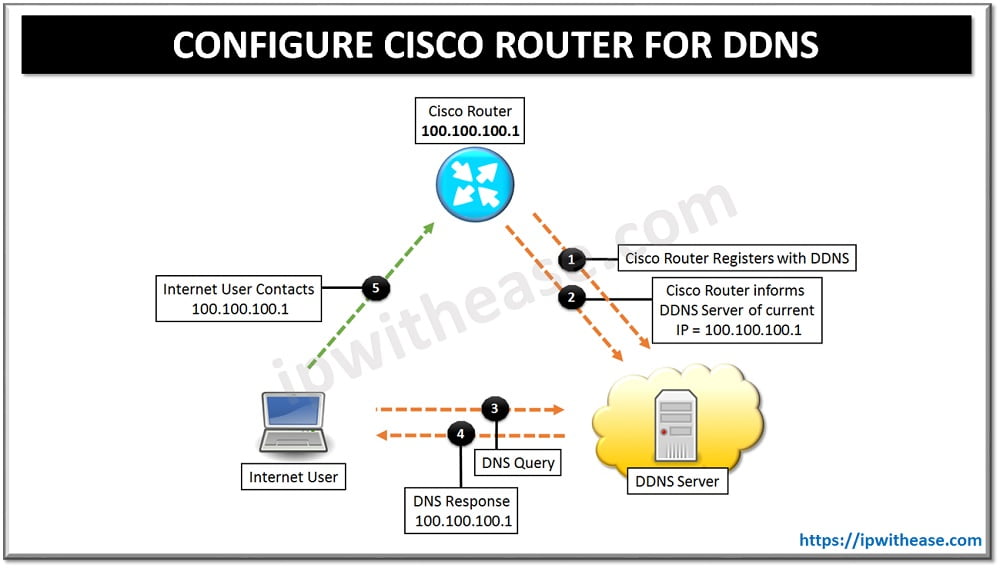
Below diagram depicts the DDNS service functioning –

DDNS Working with Cisco IOS
Below is the summary of DDNS working with Cisco IOS:
- An account needs to be created for registration with DDNS provider. Configure Cisco Internet Router to act as a DDNS client.DDNS provider creates a unique domain name, pointing to the current dynamic IP address on Cisco Internet Router.
- When Internet Router reboots or Dynamic IP address changes, it receives a new IP address from ISP. The DDNS clientnotifies the DDNS server and DNS record is updated with the new Public IP address.
- When Internet User wants to access “test.dyndns.org”, it sends the DNS query.
- DDNS repsonds to DNS query by providing the IP address 100.100.100.1 of Internet Router.
- Once User receives the Dynamic Public IP of Internet Router (100.100.100.1), user ca communicate with Internet Router through its newly assigned IP address.
Related – Configure Cisco Router as DNS Server
Configure Cisco Router for DDNS
Below is the configuration on Cisco Router to support DDNS service –
STEP 1
Enable the DNS lookup and configure an IP name server
R1# configure terminalR1(config)# ip domain-lookup

R1(config)# ip name-server 4.4.4.4

R1(config)# ip name-server 8.8.8.8
STEP 2
Next , define a DDNS update method:
R1(config)# ip ddns update method dyndnsSTEP 3
In this scenario we will use HTTP as update method under configuration,to specify the URL the router will use to contact the DDNS provider with a new Public Dynamic IP address when a change occurs.
R1(DDNS-update-method)# HTTP
add http://username:password@members.dyndns.org/nic/update?system=dyndns&hostname=<h>&myip=<a>
STEP 4
Next up, we set the update interval to ensure the FQDN is updated as frequently as possible. The interval settings configuration updates to 1 Day, 0 Hours, 0 Minutes and 0 Seconds.
R1(DDNS-HTTP)# interval maximum 1 0 0 0STEP 5
Finally, set the FQDN that will be updated and enable the DDNS service on public interface (In this scenario Dialer 0 will be used):
R1(DDNS-update-method)# interface dialer0
R1(config-if)# ip ddns update hostname test.dyndns.org
R1(config-if)# ip ddns update dyndns
To debug the DDNS enter the following commands
R1#debug ip ddns updateABOUT THE AUTHOR

You can learn more about her on her linkedin profile – Rashmi Bhardwaj


