Table of Contents
MacVLAN is a way of networking in the cloud. Docker networking in cloud work with the help of network drivers where the default driver uses a network bridge. If docker containers are created without explicit mention of the network, they get automatically connected to the default bridge network. But at times, some applications do not work properly in a bridged network using NAT where in MacVLANs come into the picture
In today’s topic we will learn about how to set up and use MacVLAN network.

What is MacVLAN
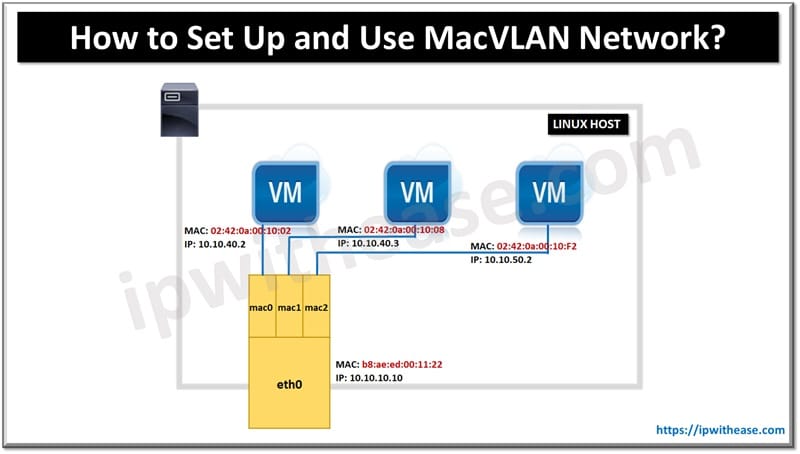
In cloud computing environments, often a common question arises: how do we expose docker containers directly to local physical networks? This is especially true when you want a container to connect to legacy applications. A possible solution for such a scenario could be to create and set up a MacVLAN network type. MacVLANs are special virtual networks which allow us to create a ‘clone’ of a physical network interface attached to Linux servers and directly attach containers to the Local area network (LAN). In this article we will learn how to create and use MacVLAN networks in docker but before that we need to understand few things:
- MacVLAN networks are usually blocked by cloud service providers hence physical access to server would be required
- MacVLAN network driver works only with Linux hosts and not supported for Windows or MAC devices
- You should be running Linux kernel 4.0 version or later
MacVLAN Modes
MacVLAN can be created in bridge mode or 802.1Q trunk mode.
In bridge mode the MacVLAN traffic is channelled via the physical interface on the Linux host.
In 802.1Q mode traffic passes through the 802.1Q subinterface created by docker to allow controlled routing and granular level filtering.
Bridge mode VLAN – to set up MacVLAN you will need a physical server or a virtual machine running Ubuntu Linux. To install docker run the below commands.
sudo apt update

sudo apt install docker.io -y
Related: MacVLAN vs IPvlan
Configure MacVLAN Network
Assume physical network interface (enp0S2) in docker host having IP address as 192.168.0.30/24 and it is connected to gateway router (192.168.0.1) in the same subnet.
The MacVLAN network (macvlan_net1) on the docker host is configured with the parent interface having set the physical interface as (enp0S2).
To create MacVLAN network use command ‘docker network create’ with additional options
sudo docker network create \ <Command to create new macvlan>

        --driver macvlan \ <macvlan driver to use>

        --subnet 192.168.0.0/24 \ <subnet of docker host>

        --gateway 192.168.0.1 \ <gateway for new network; similar to docker host>

        --ip-range 192.168.0.90/30 \< IP range used by docker DHCP; required to be excluded in primary DHCP server>

        --aux-address 'host=192.168.0.60' \ <exclude this IP address from above range>

        --opt parent=enp0S2 \ < parent interface on docket host>

        macvlan_net1 <name of new macvlan network>
Let’s understand the additional parameters given in the macvlan command as under:
- the -driver option mention macvlan driver instead of default bridge driver
- the -subnet option mention the subnet for new macvlan network
- the -gateway option mention macvlan network gateway
- the -ip range is optional and can be skipped in case you plan manual allocation of IP address for each docker container
- the -aux-address option allows exclusion of specific IP address from above IP range. This will let docker DHCP start allocation from 192.168.0.61
- the -opt mentions additional options such as interface for parent.
- The macvlan option sets name of new macvlan name
New docker network can be viewed using the below command.
Sudo docker network ls <list all docker networks>

Sudo docker inspect macvlan_net1 <to inspect new macvlan network>
Now we will create two containers and connect them to macvlan network
sudo docker run --name web1 --rm --detach --network macvlan_net1 nginx <create web1 container using nginx image>

sudo docker run --name database --rm --detach --network macvlan_net1 --env NEWDB_ROOT_PASSWORD=Check@321 newdb <create database container using newdb image in detach mode>

Note: the -network option specifies the macvlan to connect containers instead of default network
Run docker inspect macvlan command to view the containers and inspect their network configuration.
Sudo docker inspect macvlan_net1 Both containers will receive a unique MAC address and the IP address is allocated from the IP range defined. We can also assign a static IP address of our choice with the IP option while container creation in case auto assignment is not a preferred choice.
sudo docker run --name mypine --rm -itd --network macvlan_net1 --ip 192.168.0.200 mypine Inside your container you will be able to ping other containers connected to macvlan networking using their IP address and container names.
To allow communication between docker containers and default gateway we need to enable on host interface(enp0S2) promiscuity mode
sudo ip -detail -color link show enp0S2

sudo ip link set dev enp0S2 promisc on
In case docker host is a VM you need to enable promiscuous mode on the network interface in VM settings.
By default, traffic originating from docker containers to docker host is filtered by the kernel for enforcing strong security and network isolation. Our docker host will not be able to ping docker containers and vice versa until we create a macvlan interface to pass traffic to containers. We can use the excluded IP address (192.168.0.60) here for the new macvlan interface on docker host.
sudo ip link add macvlan_int1 link enp0S2 type macvlan mode bridge <command to create macvlan interface>

sudo ip address add 192.168.0.60/32 dev macvlan_int1 <static IP address assignment to macvlan interface>

sudo ip link set macvlan_int1 up <bring interface up>

sudo ip route add 192.168.0.90/30 dev macvlan_int1 <add static route to docker macvlan network via macvlan interface on host>
use below command to view new macvlan interface and route to docker host
sudo ip -br -col add show

sudo ip route
ABOUT THE AUTHOR

You can learn more about her on her linkedin profile – Rashmi Bhardwaj


