Table of Contents
Introduction to vSmart
vSmart is the brain of the system. It controls data plane policies of routing and security. vSmart is positioned centrally in topology with all vEdges. Operating principle of vSmart is identical as BGP route reflector or DMVPN NHRP. vSmart provides control plane functionality. vSmart is highly scalable and can handle up to 5,400 connections per vSmart server with up to 20 vSmarts in a single production deployment.
vSmart is responsible for the implementation of control plane policies, centralized data polices, service chaining, and VPN topologies in SD-WAN devices. vSmart also handles the security and encryption of the fabric by providing key management. Separating the control plane from the data and management planes allows the solution to achieve greater scale while simplifying network operations. vSmart controller utilize Overlay Management Protocol (OMP) to handle routing, it would be a disservice to consider it simply a routing protocol.
The remainder of this section will cover deployment of the vSmart controller, using the following steps:
Step 1. Deploy the vSmart virtual machine from the downloaded OVA.
Step 2. Bootstrap and configure the vSmart controller.
Step 3. Manually install the root CA certificate on vSmart.
Step 4. Add the vSmart controller to vManage.
Step 5. Generate, sign, and install the certificate onto the vSmart controller.
Step 1/2/3: Deploy vSmart Virtual Machine, configure vSmart Controller; Manually Install Root CA Certificate on vSmart
- Install the vSmart OVA onto VMware ESXi or KVM and power up the VM. The default username and password is admin/admin.
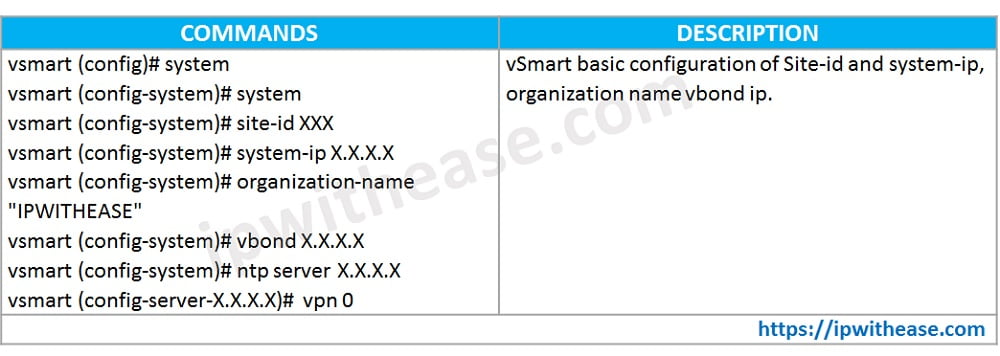
- Now that the OVA is installed and powered up, let’s apply the initial bootstrap configuration. Just like with the vBond controller, you first need to configure system options (such as site ID, system IP, organization name, and vBond address).
vSmart Initial System Configuration

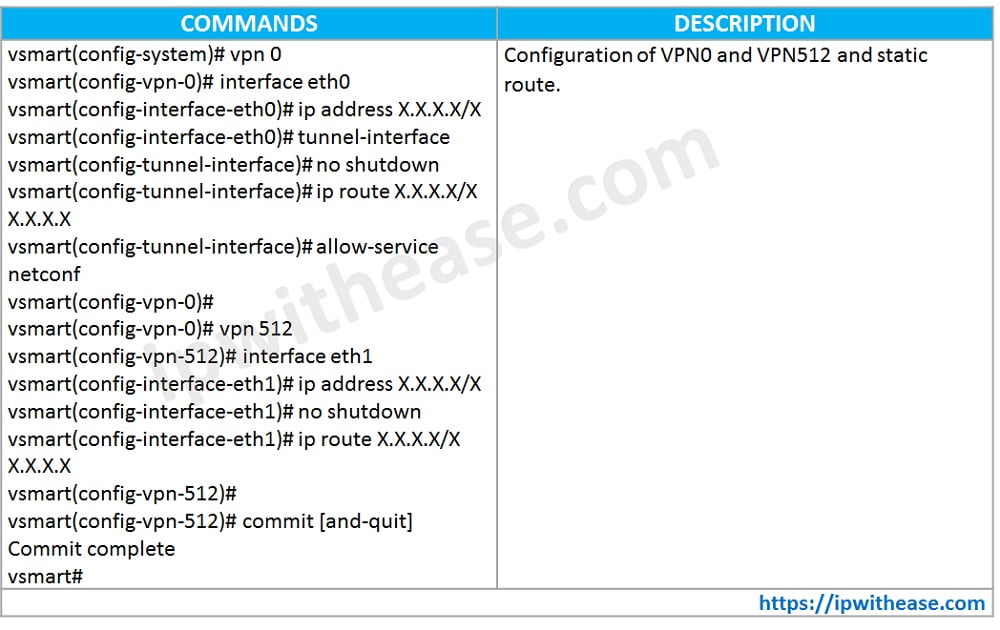
- Next on the list is to configure the VPN 0 context. This configuration is slightly different from vBond configuration, however. When the tunnel-interface command is applied, a firewall is enabled (since it is assumed that this interface will be connected to untrusted networks). By default, Netconf is blocked. Since vManage uses Netconf to initially connect as well as push configuration, we need to allow this. Unblocking Netconf is accomplished with the command allow-service netconf under the tunnel interface.
vSmart VPN 0 and VPN 512 Configuration

- Next, the network administrator needs to manually install the root CA certificate. This is most easily achieved by copying the file to the vSmart controller using your favorite SCP program. By default, the file is copied to the /home/admin directory on the vSmart controller. Once this file is copied, the certificate needs to be installed. This is accomplished via the request root-cert-chain install <directory> command,

Step 4/5: Add vSmart Controller to vManage; Generate and Install certificate onto vSmart Controller
The remaining bootstrap steps will be performed from the vManage GUI. The process is identical to the vBond controller to add the vSmart controller.
- First, browse to Configuration > Devices > Controllers from the vManage GUI. From here, select Add Controller and select
- A dialog box will appear asking for vSmart’s IP address, username, and password. You also have the option to use either DTLS or TLS. By default, we use DTLS. Leave the Generate CSR box checked.
- The next step is to download the CSR, have it signed, and install the corresponding certificate. To access this screen, browse to Configuration > Certificates > Controllers. Once on this screen, click the ellipsis to the right of the vSmart controller and select View CSR. Copy the CSR to a text file or download the CSR.
- The final step is to install the signed certificate. As we did with the vBond and vManage controllers, select Install Certificate in the upper right-hand corner. A dialog box will appear. Either paste the contents of the certificate into the window or select the certificate file using the Select a file Once it is uploaded, click Install.
Continue Reading:
vManage Controller Deployment: Cisco SDWAN Deployment Guide
Cisco SD-WAN Template: Configuration & Deployment
ABOUT THE AUTHOR

You can learn more about her on her linkedin profile – Rashmi Bhardwaj


