Cisco SD-WAN Template Configuration
Configuration on device can be complete either by applying manually, CLI using SSH/console or via vManage GUI by using template engine. All configuration should be made on vManage controller. Template engine also supports rollback feature if any human error occurred while configuring. These configuring solutions work by allowing the network administrator to pre-configure the device within the vManage controller.
Once the vManage controller discover the device, it will automatically apply the template to the attached device. WAN Edge devices support mechanisms such as PNP (Plug n Play) and ZTP (Zero Touch Provisioning) to automatically bring the device online. Using the vManage GUI is the preferred mechanism, as it is less error prone and has support for automatic recovery.
Benefit of using SD-WAN template:
- SD WAN can reduce the time of deployment by using templates.
- SD WAN can reduce the mistakes while deployment.
- SD WAN can reduce deployment costs by separating activities at different skill levels.
- SD WAN adds consistency throughout deployment.
- SD WAN remove different engineer design preferences.
- SD WAN not require an Engineer presence to install and could be self-install.

Create a Device Template from the GUI
To create templates, Click on Configuration > Templates. Below are steps to create configuration template on vManage controller GUI.
Step 1. Go to the configuration section for templates.
Step 2. The next step is to create feature templates. Select Feature (tab) > Add Template.
Step 3. Select the values can be either variables, global parameters, or the default parameter and assign a name of template.
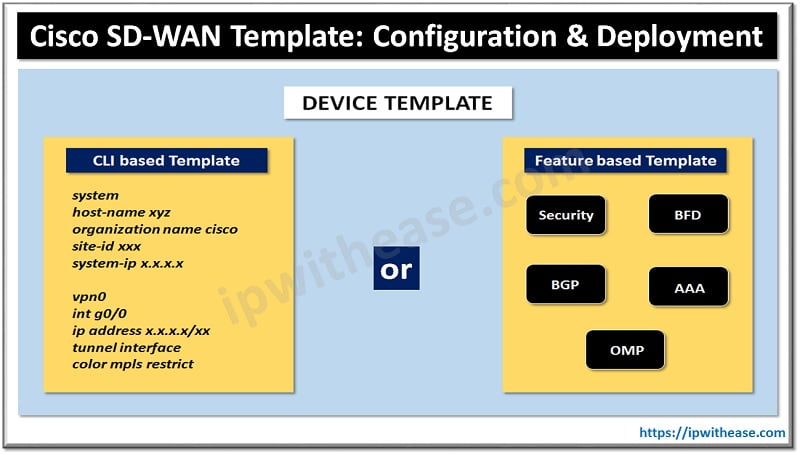
Step 4. Now that the feature templates have been created, it can be attached to their respective device templates. Click Device (tab) followed by Create Template. After you click Create Template, the option to create a CLI based template or a feature-based template is provided. Select from Feature Template.
Step 5. Apply the selected feature template to the device.
Step 6. Now the device template is created, you can attach it to the devices.
Step 7. You can select the devices, where configurations should be applying to.
Create a Device Template from the CLI
To create a device template by entering a CLI configuration directly on the vManage controller:
Step 1. In the Device tab, click the Create Template and select CLI Template.
Step 2. Select the type of device for which you are creating the template.
Step 3. Enter the name of template.
Step 4. Enter a description for the device template.
Step 5. In the CLI Configuration box, enter the configuration either by typing it, cutting and pasting it, or uploading a file.
Step 6. Click Add.
Edit a Template
Step 1. In the Device or Feature tab, select the name of template.
Step 2. Click the More icon to the right of the row and click Edit.
View a Template
Step 1. In the Device or Feature tab, select the name of template.
Step 2. Click the More icon to the right of the row and click View.
Delete a Template
Step 1. In the Device or Feature tab, select the name of template.
Step 2. Click the More icon to the right of the row and click Delete.
Step 3. Click OK to confirm the deletion of template.
View Device Templates Attached to a Feature Template
Step 1. In the Feature tab, select the name of template.
Step 2. Click on the More icon to the right of the row and click Show Attached Device Templates.
View Devices Attached to a Device Template
Step 1. In the Device tab, select the name of the template.
Step 2. Click the More icon to the right of the row and click Attach Devices.
Copy a Template
Step 1. In the Device or Feature tab, select the name of template.
Step 2. Click the More icon to the right of the row and click Copy.
Step 3. Enter a new template name and description.
Step 4. Click Copy.
Edit a CLI Device Template
Step 1. In the Device tab, select the name of the template.
Step 2. Click the More icon to the right of the row and click Edit.
Step 3. Click on Edit button and then update.
Export a Spreadsheet in CSV Format for a Template
Step 1. In the Device tab, click on the device template where configuration needs to be pushed.
Step 2. Click the More icon to the right of the row and click Export CSV.
Preview the Configuration & Configuration Differences
Step 1. In the Device tab, select a device template.
Step 2. Click the More icon to the right of the row and click Change Device Values. The right pane displays the device’s configuration.
Step 3. In the left pane view, click the name of device. Click the configuration difference tab to view the differences between this configuration and the configuration currently running on the device.
Continue Reading:
ABOUT THE AUTHOR

You can learn more about her on her linkedin profile – Rashmi Bhardwaj


