Cisco ASA Firewall has the feature support to be divided into multiple virtual devices known as Device Contexts. With each context being an independent device, having own security policy, interfaces and administrators.
While features like routing tables, firewall features, IPS, and management being supported in multiple context mode, some features are not supported like VPN and dynamic routing protocols.
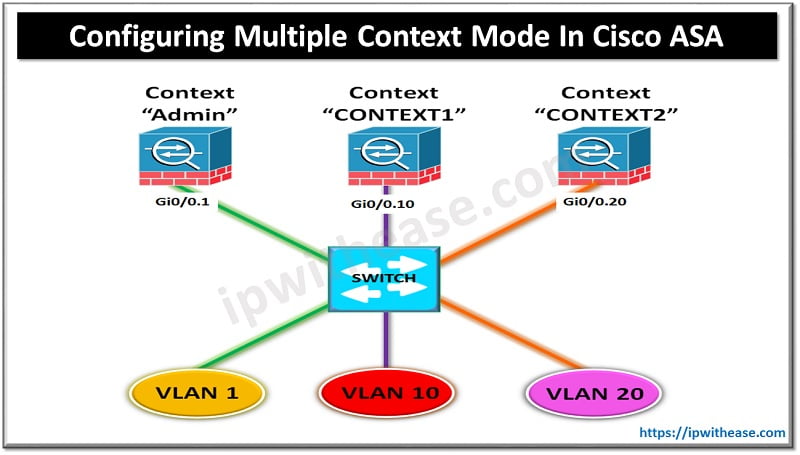
Following diagram will be referred to while configuring Multiple contexts on ASA Firewall.

Below is a step by step procedure to enable multiple context mode –
Step 1 – Enable multiple context mode.
Step 2 – (Optional) Configure classes for resource management.
Step 3 – Configure interfaces in the system execution space
Step 4 – Configure security contexts.
Step 5 – (Optional) automatically assign MAC addresses to context interfaces.
Step 6 – Complete interface configuration in the context.
Related – Cisco ASA Interview Questions
STEP 1 – ENABLE MULTIPLE CONTEXT MODE.
Before configuring multiple context mode, let’s see what is the present context mode of ASA Firewall –
Now lets change mode to “Multiple” Context mode –
WARNING: This command will change the behavior of the device
WARNING: This command will initiate a Reboot
Proceed with change mode? [confirm]
Convert the system configuration? [confirm]
!
The old running configuration file will be written to flash
Converting the configuration – this may take several minutes for a large configuration
The admin context configuration will be written to flash
The new running configuration file was written to flash
Security context mode: multiple
***
*** — SHUTDOWN NOW —
***
*** Message to all terminals:
***
*** change mode
Rebooting……
Now lets verify the context mode –
ASA#
As shown from the output, ASA is configured in the “Multiple” Context mode.
–
STEP 2 – (OPTIONAL) CONFIGURE CLASSES FOR RESOURCE MANAGEMENT.
For example, to set the default class limit for conns to 10 percent instead of unlimited, enter the
following commands:
To add a class called gold, enter the following commands:
ASA(config-class)# limit-resource conns 15%
ASA(config-class)# limit-resource rate conns 1000
ASA(config-class)# limit-resource rate inspects 500
ASA(config-class)# limit-resource hosts 9000
ASA(config-class)# limit-resource asdm 5
ASA(config-class)# limit-resource ssh 5
ASA(config-class)# limit-resource rate syslogs 5000
ASA(config-class)# limit-resource telnet 5
ASA(config-class)# limit-resource xlates 36000
–
STEP 3 – CONFIGURE INTERFACES IN THE SYSTEM EXECUTION SPACE
Interface GigabitEthernet0/0.20
Vlan 20
STEP 4 CONFIGURE SECURITY CONTEXTS.
ASA(config)# context administrator
ASA(config-ctx)# allocate-interface gigabitethernet0/0.1
ASA(config-ctx)# config-url flash:/admin.cfg
ASA(config-ctx)# context CONTEXT1
ASA(config-ctx)# allocate-interface gigabitethernet0/0.10 int10
ASA(config-ctx)# config-url disk0:/CONTEXT1.cfg
ASA(config-ctx)# member gold
ASA(config-ctx)# context CONTEXT2
ASA(config-ctx)# allocate-interface Gigabitethernet0/0.20 int20
ASA(config-ctx)# config-url disk0:/CONTEXT2.cfg
ASA(config-ctx)# member gold
STEP 5 – (OPTIONAL) AUTOMATICALLY ASSIGN MAC ADDRESSES TO CONTEXT INTERFACES.
The MAC address is used to classify packets within a context
STEP 6 – COMPLETE INTERFACE CONFIGURATION IN THE CONTEXT.
ASA/CONTEXT1(config)# interface int10
ASA/CONTEXT1(config-if)# nameif INSIDE_CONTEXT1
ASA/CONTEXT1(config-if)# security-level 100
ASA/CONTEXT1(config-if)# ip address 10.10.10.1 255.255.255.0
ASA/CONTEXT1(config-if)# end
Now let’s move to CONTEXT2 context and configure interfaces.
ASA/CONTEXT2(config)# interface int20
ASA/CONTEXT2(config-if)# nameif INSIDE_CONTEXT2
ASA/CONTEXT2(config-if)# security-level 100
ASA/CONTEXT2(config-if)# ip address 20.20.20.1 255.255.255.0
ASA/CONTEXT2(config-if)# end
VERIFICATION
Below verification shows the contexts formed on ASA and associated interfaces to each context –
Context Name Class Interfaces URL
*admin default disk0:/admin.cfg
CONTEXT1 gold GigabitEthernet0/0.10 disk0:/CONTEXT1.cfg
CONTEXT2 gold GigabitEthernet0/0.20 disk0:/CONTEXT2.cfgTotal active Security Contexts: 3
ABOUT THE AUTHOR

You can learn more about her on her linkedin profile – Rashmi Bhardwaj


