Table of Contents
Introduction to Intrusion detection & prevention
Intrusion detection and prevention (IDS/IPS) is an important key to branch security and a component of the Cisco SD-WAN security. An IDS/IPS can inspect traffic in real time in order to detect and prevent cyberattacks by comparing the application behavior against a known database of threat signatures. Once detected, an IDS/IPS can notify the network operator through syslog events and dashboard alerts as well as stop the attack by blocking the threatening traffic flow.
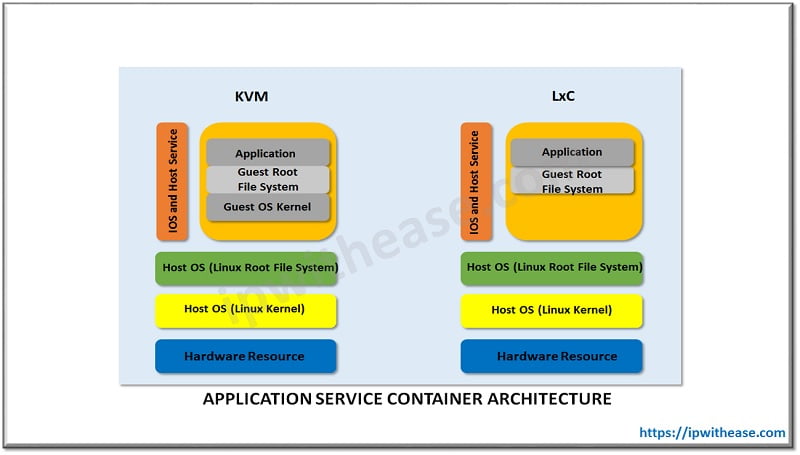
IDS/IPS is enabled through the use of IOS-XE application service container technology The two VM types:
- Kernel Virtual Machines (KVM)
- Linux Virtual Containers (LxC)
These two container types differ from the Linux kernel used in most network operating systems, such as IOS XE. LxC containers use many of the kernel resources of the host, while KVM containers have their own independent kernel.
Signature Level:
It is a set of rules that is used to detect typical intrusive activity, such as DoS attacks. Three Signature Levels available within vManage:
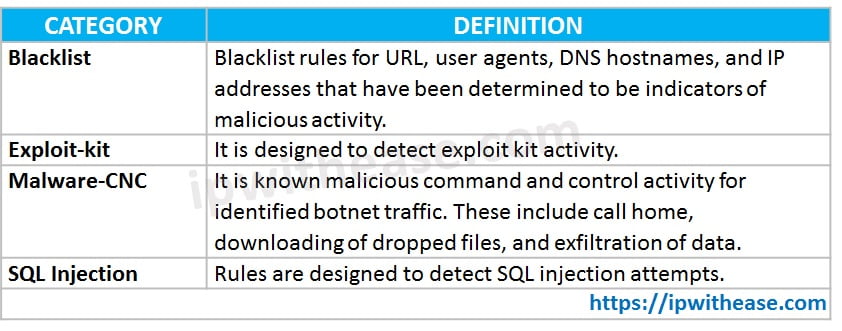
- Balanced: This is the default signature set. The Balanced signature set is designed to provide protection without a significant effect on system performance.
Table for Balanced Signature Set
- Connectivity: This signature set contains rules from the current year and the previous two years for vulnerabilities with a CVSS score of 10. The Connectivity signature set is less restrictive, with better performance, as there are fewer rules attached to this signature level.
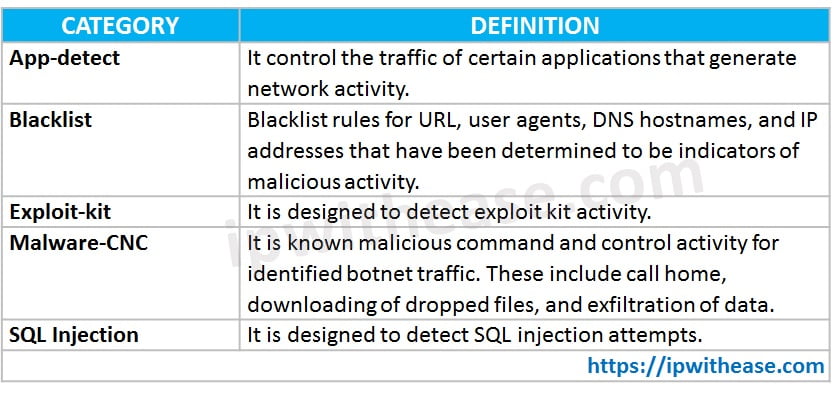
- Security: This signature set contains rules that are from the current year and the previous three years. With more added rules, this signature level offers more protection, but overall performance of your WAN Edge device may be lower.
Table for Security Signature Set
Configure Intrusion Detection or Prevention
Step 1. In vManage, Go to the Configuration. Then the Security tab in the left side panel.
Step 2. Click Add Security Policy.
Step 3. Select an option that supports intrusion prevention (Compliance, Direct Cloud Access, Direct Internet Access, or Custom) and click on proceed to add an Intrusion Prevention policy in the wizard.
Step 4. In the Add Security Policy wizard, click Next.
Step 5. Click on drop-down and choose Create New. Policy Rule Configuration wizard appears.
Step 6. Click on VPNs to add the required number of target service VPNs in the Add Target VPNs wizard.
Step 7. Enter a policy name in the Name field.
Step 8. Choose a signature level that defines rules for evaluating traffic from the drop-down.
- Balanced
- Connectivity
- Security
Step 9. Choose mode of operation from the drop-down.
- Detection: Select this option for detection mode.
- Protection: Select this option for protection mode.
Step 10. Choose an alert level for syslogs from the Level drop-down.
- Emergency
- Alert
- Critical
- Error
- Warning
- Notice
- Info
- Debug
Step 11. Click Save and Next.
Step 12. Enter Security Policy Name and Description in the fields appeared.
Step 13. If you set an alert level when configuring the IPS, in the Additional Policy Settings section, you must specify the following:
- External Syslog Server VPN
- Server IP: IP address of the server
- Failure Mode: Open or Close
Step 14. Click Save Policy to configure the Security policy.
Step 15. Apply a Security Policy to a Device.
Modify an Intrusion Detection or Prevention Policy
Step 1. In vManage, Go to the Configuration. Then the Security tab in the left side panel.
Step 2. Click on the drop-down and select Intrusion Prevention.
Step 3. Click on the More Actions icon to the policy name you want to edit.
Step 4. Modify the policy as required and click Save.
Delete an Intrusion Detection or Prevention Policy
Step 1. In vManage, Go to the Configuration. Then the Security tab in the left side panel.
Step 2. Click on the More Actions icon and select Edit. Detach the policy.
Step 3. Click the More Actions icon to the policy and select Delete.
Step 4. Click OK.
Monitor Intrusion Prevention Policy
Step 1. Go to the Monitor > select a device.
Step 2. Select the Intrusion Prevention tab under Security Monitoring. The Intrusion Prevention wizard will display.
Step 3. Click by Severity or by Count to designate how you want to display intrusion prevention information.
Continue Reading:
Cisco SD-WAN: Ways to Secure Network
Difference between IPS and IDS
ABOUT THE AUTHOR

You can learn more about her on her linkedin profile – Rashmi Bhardwaj

