Table of Contents
Ways to Secure Network
In CISCO SD-WAN, we have many ways to secure data from attacks like URL filtering, Advanced Malware Protection (AMP) and Threat Grid and DNS Web Layer security, Cloud security. Let’s study on options to secure network.
URL Filtering To Secure Network
URL Filtering is Cisco SD-WAN security function that leverages the Snort engine for inspection of HTTP and HTTPS. The URL Filtering engine enforces acceptable use controls to block or allow websites. An administrator can choose to permit or deny websites based on 82 different categories. Custom black and white lists can also be created with customized end user notifications, in order to bypass the URL Filtering engine for websites that are internal or trusted.
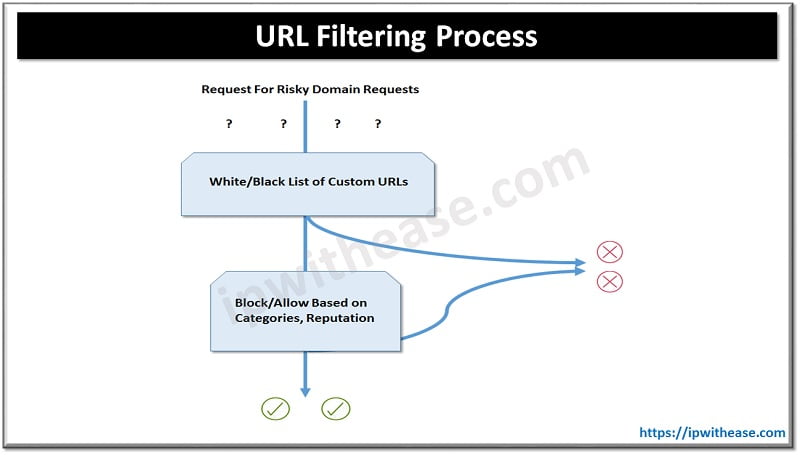
URL Filtering Process:
When an end user requests access to a particular website through their web browser, the URL Filtering engine inspects the web traffic and first queries any custom URL lists. If the URL matches an entry in the whitelist, access is granted with no further inspection or processing. If the URL matches an entry in the blacklist, access is denied with no further inspection. When access is denied, the user can be redirected to a block page with a customizable message or can also be redirected to a custom URL. If the URL is not on either list, it is subject to inspection and will then be compared against the blocked or allowed categories policy. If allowed through the category inspection, the web reputation will then be considered and, based on the strictness of the policy, the page will either be allowed or blocked.
Steps to configure a URL Filtering policy in Cisco SD-WAN:
Step 1. Create a new URL Filtering policy. Name the policy.
Step 2. Configure web categories. Specify the blocked or allowed web category list.
Step 3. Configure the web reputation. Specify the web reputation for allowed websites.
Step 4. Configure whitelist URL list (optional). Specify the URLs that should always be allowed.
Step 5. Configure blacklist URL list (optional). Specify the URLs that should always be blocked.
Step 6. Configure block page (optional). Specify the block page content.
Step 7. Configure the alerts and logs (optional). Specify which alerts should be generated.
Step 8. Configure target VPNs. Specify the VPNs to be inspected.
AMP and Threat Grid
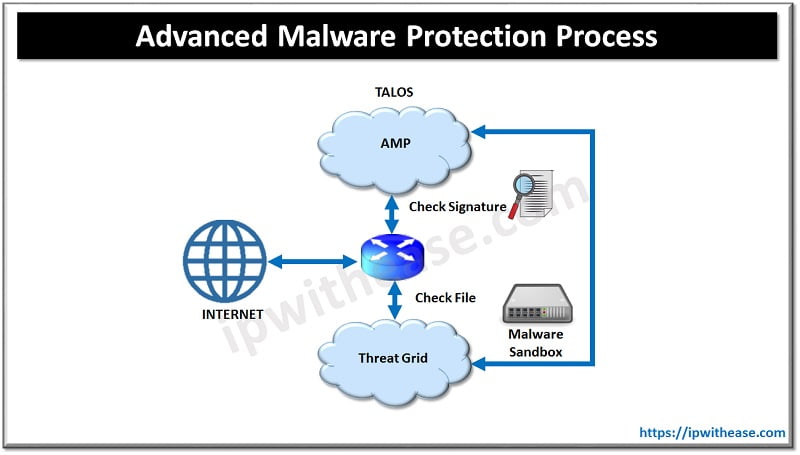
Advanced Malware Protection (AMP) and Threat Grid are the newest additions to Cisco SD-WAN security. AMP and Threat Grid leverage the Snort engine and Talos for inspection of file downloads and detection of malware in real time. AMP can block malware trying to enter your network using antivirus detection engines, one-to-one signature matching, machine learning, and fuzzy fingerprinting.
- Clean: If clean, the file download is allowed to complete.
- Malicious: If malicious, the file download is interrupted and stopped.
- Unknown: If unknown (provided that Threat Grid is enabled) and active content is found, the WAN Edge router sends the file to Threat Grid for sandboxing. The WAN Edge router queries Threat Grid for a period of time and then queries AMP for retrospection. Threat Grid then updates the new status of the hash in the AMP cloud once it is known.
Steps to configure an Advanced Malware Protection and Threat Grid policy in Cisco SD-WAN:
Step 1. Create a new AMP policy. Name the policy.
Step 2. Configure AMP cloud region. Specify the region to use for AMP cloud: North America (NAM), Europe (EU), or Asia Pacific (APJC).
Step 3. Configure the AMP alerts log level. Specify which alerts level should be considered.
Step 4. Enable Threat Grid file analysis (optional). Enable Threat Grid file analysis, if applicable.
Step 5. Configure Threat Grid API key. Specify the Threat Grid API key.
Step 6. Configure file types. Specify, from a list, the file types to be inspected.
Step 7. Configure the Threat Grid alerts log level. Specify which alerts level should be considered.
Step 8. Configure target VPNs. Specify the VPNs to be inspected.
DNS Web Layer Security
Cisco SD-WAN security leverages the Cisco Umbrella cloud in order to bring web security. DNS Web Layer security integration prevents enterprise branch users and guests from accessing inappropriate content or malicious sites that might contain malware, phishing attacks, and other security risks.
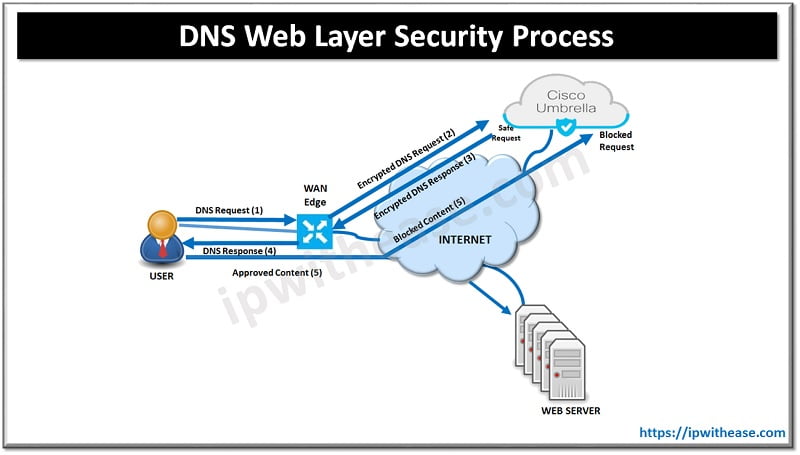
DNS Web Layer Security Process:
Once registered with Umbrella cloud, the WAN Edge router intercepts DNS requests from the LAN and redirects them to Umbrella resolvers. If the requested page is a known malicious site or is not allowed (based on the policies configured in Umbrella portal), the DNS response will contain the IP address for an Umbrella-hosted block page. The DNS response will contain the IP address of the destination website if the site is considered to have good reputation, is not malicious, and is allowed by the policy configured on the Umbrella portal. If Umbrella is not completely certain that the page being requested is safe, Intelligent Proxy can be enabled so that the Umbrella cloud acts as a man-in-the-middle. In this way, Umbrella can inspect the page data as it loads to avoid compromising the security of the end user.
Steps to configure DNS Web Layer security with Cisco Umbrella:
Step 1. Create a new DNS Security policy. Name the policy.
Step 2. Generate and register Umbrella API token. In the Umbrella cloud portal, generate an API token and configure vManage with the token so as to register with Umbrella cloud.
Step 3. Configure local domain bypass list (optional). Define the list of local domains that should bypass inspection.
Step 4. Configure DNS server IP. Specify the DNS server to use for redirection: Umbrella default or a custom DNS.
Step 5. Configure DNSCrypt. Enable or disable DNSCrypt.
Step 6. Configure target VPNs. Specify the VPNs to be inspected.
Continue Reading:
ABOUT THE AUTHOR

You can learn more about her on her linkedin profile – Rashmi Bhardwaj


