AAR – AUTOMATED ALTERNATE ROUTING on CUCM
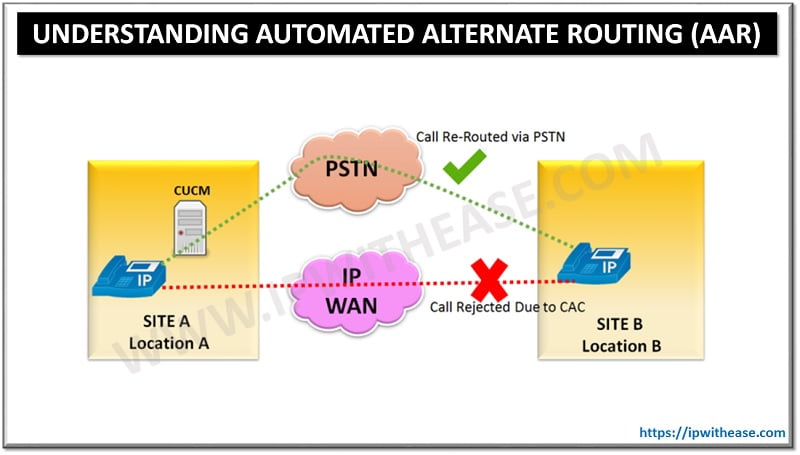
CUCM has provision to automatically re-route the calls to PSTN which fail due to insufficient bandwidth available between the two locations. The Automated Alternate Routing (AAR) feature enables Cisco Unified Communications Manager to establish an alternate path for the voice media when the preferred path between two intra-cluster endpoints runs out of available bandwidth, as determined by the locations mechanism for CAC.
AAR Feature is mostly deployed in Centralized Call Processing Environments where locations based CAC has already been enabled.
Let’s understand further AAR behavior across location –
If the bandwidth between the two locations isn’t sufficient to complete the call, then instead of blocking the call CUCM uses the table of AAR groups and the external number of the terminating directory number to supply the alternate number that is used to reroute the call through the PSTN or other network.
AAR can support following two call scenarios:
- IP phone 1 in location A > Calls IP Phone 2 in location B.
- Incoming call from a Gateway in Location A to IP phone in Location B.
In order to enable AAR service parameter “ AAREnable “ should be set to true.
CUCM uses the device-based AAR calling search space, assigned to IP Phone station devices and gateway, when it attempts to route the call to the gateway device that connects to the PSTN or other network. Cisco Unified Communications Manager uses the external phone number mask and the directory number of the line or DN and the Cisco voice-mail port to derive the alternate number that is used to reroute the call.
CONFIGURATION STEPS:
Step 1:
Step 2:
- Choose Call Routing>AAR groups and click Add New.
- Enter the name test_aar.
- Click Save
Step 3:
- Choose Device > Phone 1
- Click Line 1
- In the AAR Settings pane, choose test_aar for the AAR Group.
- Verify that the external phone number mask is in globalized format.
- Click Save.
- From the Related Links, choose Configure Device and click Go.
- At the Phone Configuration window, choose AAR_CSS for the AAR CSS.
- Click Save and then OK in the pop-up window.
Same configuration should follow for the Phone 2 at remote site in Location B to which the call is made.
Related- CUCM Region Settings in VOIP Calls
ABOUT THE AUTHOR

You can learn more about her on her linkedin profile – Rashmi Bhardwaj


