MIP in Juniper ScreenOS
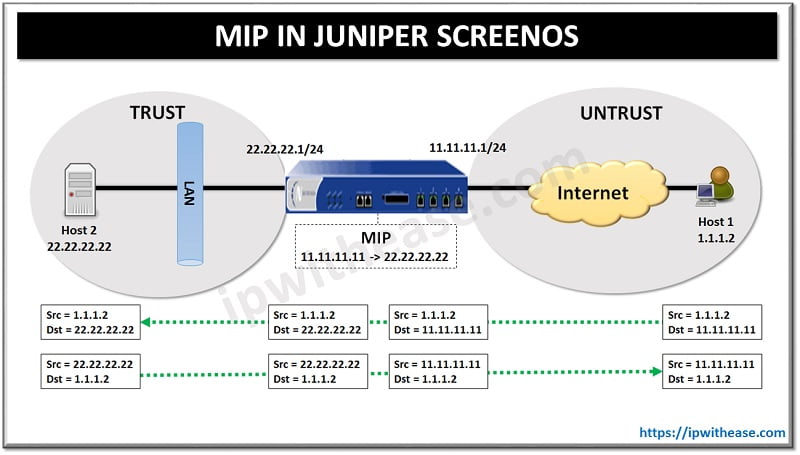
For those familiar with JUNOS, MIP in ScreenOS is equivalent to Static NAT in JUNOS. Mapping of one IP address to another directly is called MIP. Essentially, a MIP is static destination address translation, mapping the Destination IP address in an IP packet header to another static IP address. When a host with MIP initiates outbound traffic, the security device translate source IP address of the host to MIP address. This Bidirectional translation is different from behavior of source and Destination address translation.
An example can substantiate the understanding of MIP –

If the security device applies a policy NAT – destination for traffic sent from Host 1 to Host 2, the security device translates the original destination IP address from 11.11.11.11 to 22.22.22.22 (It also translates the source IP address from 22.22.22.22 to 11.11.11.11 while the receiving host 2 responds back to host 1)
MIPs allow inbound traffic to reach private addresses in a zone whose interface is in NAT mode. MIPs also provide part of the solution to the problem of overlapping address spaces at two sites connected by a VPN tunnel.
2 Approaches of Configuring MIP in Juniper ScreenOS :
APPROACH 1 – (Using Web GUI)
1. InterfacesNetwork > Interfaces > Edit (for ethernet1):
Enter the following, then click Apply:
Zone Name: Trust
Static IP: (select this option when present)
IP Address/Netmask: 22.22.22.1/24
Select the following, then click OK:
Interface Mode: NAT
Network > Interfaces > Edit (for ethernet2): Enter the following, then click OK:
Zone Name: Untrust
Static IP: (select this option when present)
IP Address/Netmask: 11.11.11.1/24
NOTE: No address book entry is required for a MIP or for the host to which it points.
Untrust Zone
Internet
Traffic destined for 11.11.11.11 arrives at ethernet2. The security device looks up the route for a MIP on ethernet2 and resolves 11.11.11.11 to 22.22.22.22 The security device looks up the route to 22.22.22.22 and forwards traffic out ethernet1.
Untrust Zone Interface – ethernet2, 11.11.11.1/24
Trust Zone Interface – ethernet1, 22.22.22.124
Trust Zone
Webserver
22.22.22.22
Global Zone
MIP 11.11.11.11 -> 22.22.22.22
(Configured on ethernet2)
2. MIP
Network > Interfaces > Edit (for ethernet2) > MIP > New: Enter the following, then click OK:
Mapped IP: 11.11.11.11
Netmask: 255.255.255.255
Host IP Address: 22.22.22.22
Host Virtual Router Name: trust-vr
3. Policy
Policies > (From: Untrust, To: Trust) New: Enter the following, then click OK:
Source Address:
Address Book Entry: (select), Any
Destination Address:
Address Book Entry: (select), MIP (11.11.11.1)
Service: HTTP
Action: Permit
APPROACH 2 – (CLI Configuration)
1. Interfaces set interface ethernet1 zone trust
set interface ethernet1 ip 22.22.22.1/24
set interface ethernet1 nat
set interface ethernet2 zone untrust
set interface ethernet2 ip 11.11.11.1/24
2. MIP
set interface ethernet2 mip 11.11.11.11 host 22.22.22.22 netmask 255.255.255.255
vrouter trust-vrration Of MIP
Continue Reading:
How to Factory Reset Juniper SRX Device
Enable/Disable Interface in Juniper
ABOUT THE AUTHOR

You can learn more about her on her linkedin profile – Rashmi Bhardwaj


