Cypress is an open-source framework created specifically for modern web applications and aims to eliminate the pain points that QA teams often face while testing. Cypress offers various types of testing, including end-to-end testing, unit testing, integration testing, and API testing, making it highly versatile.
If you are new to Cypress web testing, this blog will introduce you to the features of Cypress framework and E2E testing, while also walking you through the process of creating fast and reliable end-to-end tests with Cypress.

Cypress Framework
Cypress is a modern JavaScript-based end-to-end testing framework that provides a comprehensive set of features for writing fast, reliable, and maintainable tests.
With Cypress, developers can write tests using Mocha and Chai, and run them in an integrated development environment (IDE) that provides a visual representation of test runs.
Features:
- Automatic waiting: Cypress automatically waits for commands and assertions before moving on to the next step, eliminating the need for manual wait commands.
- Real-time reloads: When a tester saves a test file (such as a file named abc_spec.js), they will most likely want to rerun it. As a result, Cypress automatically triggers the next run in the browser as soon as the tester saves the file.
It provides real-time reloads when developers make changes to the code, making it easier to test and debug changes.
- Command Log with Snapshots: Captures snapshots while running tests. So, you can easily see what happened at each step by hovering over the commands in the Command Log.
- Has an interactive test runner that displays real-time test results and helps to troubleshoot errors.
- Cross-browser testing: allows you to test your app across different browsers and devices, ensuring consistent behavior across different platforms.
End-to-End Testing
End-to-end (E2E) testing verifies an application’s behavior as it would be experienced by a user, from start to finish. It tests all components and interactions of the application, including the user interface, application programming interfaces (APIs), databases, and other integrations.
- E2E testing simulates the actions of a real user, providing more realistic results and detecting issues that might go unnoticed in other types of testing.
- Detects issues early in the development process before they become more expensive and time-consuming to fix.
- Assures that the program is functioning as intended for the end user.
- Also, aids in the prevention of system regressions as new features are introduced or code changes are performed.
Now that you know what Cypress and end-to-end testing are, let’s dive into how to use Cypress to create fast and reliable end-to-end tests.
Install Cypress Framework
The best part about Cypress is that you can use it with any front-end project, whether it’s built with React, Angular, Vue, or just plain JavaScript. Depending on whether you use npm or yarn, you can choose the appropriate command to install it.
To install Cypress, use the following command in your terminal:
npm install cypress –save-dev
This will install Cypress and save it as a development dependency in your project. If you’re using yarn, you can use the following command instead:
yarn add cypress –dev
Before installing Cypress, it’s important to ensure that you have already run the command npm init or that your project has a node_modules folder or a package.json file in the root directory. It ensures that Cypress is installed in the correct directory and can be accessed by your project.
Primary Cypress Constructs:
The syntax used for developing test cases in Cypress is based on Mocha’s syntax. Here are some of the majorly used constructs of Cypress:
Describe: This is used to group related tests together. It is a function that takes two parameters: a string that describes the tests and a callback function that contains the actual test code.
It: This is used to write individual tests. Furthermore, it is also a function that takes two parameters: a string that describes the test and a callback function that contains the test code.
Before and After: These are hooks that are used to run code before and after a suite of tests or a single test. Before is run once before any of the tests in the suite, and after is run once after all the tests in the suite have been completed.
beforeEach and afterEach: These are hooks that are used to run code before and after each test. beforeEach is run before each test, and afterEach is run after each test.
cy: This is an object that provides a set of commands that can be used to interact with elements on a web page, such as clicking on buttons, filling out forms, and asserting the content of the page.
Assertions: These are used to verify that certain conditions are true. Cypress provides a set of built-in assertions that can be used to check things like the existence of an element on the page, the value of an input field, or the contents of a specific HTML element.
Fixtures: These are used to store data that can be used in tests. Fixtures are typically JSON files that contain data in a structured format, such as an array of objects.
Creating and Running Your First Cypress Test
Step 1: First, open the Cypress Test Runner by running the command npx cypress open in your project’s root directory.
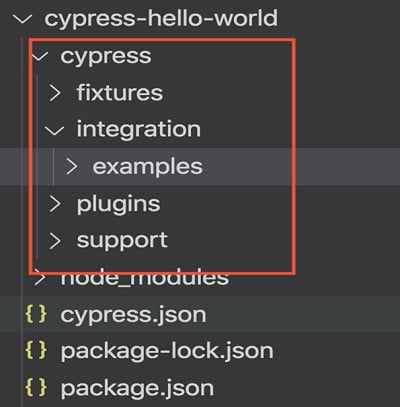
When you install Cypress within an existing project, it creates subfolders within the main Cypress folder by default. These sub-folders include fixtures, integration, plugins, and support, as shown below.

The fixtures folder contains any static test data, the integration folder contains your test files, the plugins folder contains any custom Cypress plugins you create, and the support folder contains files that help configure your tests.
Step 2: Once Cypress is open, create a new file in the “cypress/integration” folder with a .spec.js extension to create your first test. For example, you can create a new file named sample_spec.js.
Step 3: Add the following code to the sample_spec.js file:
describe(‘My First Test’, () => {
it(‘Visits the Cypress homepage’, () => {
cy.visit(‘https://www.cypress.io’)
})
})
(This code uses the describe and its functions provided by Cypress to define a test. The test visits the Cypress homepage using the cy.visit command.)
Step 3: Save the sample_spec.js file.
Step 4: Back in the Cypress Test Runner, click on the sample_spec.js file to run the test.
Step 5: You should see a new browser window open and navigate to the Cypress homepage. Once the page loads, your test is passed.
That’s it! You’ve just run your first Cypress test. You can use this example as a starting point to create more complex tests that interact with your own application.
Cypress Testing With LambdaTest
LambdaTest is an intelligent unified digital experience testing cloud that allows testers reduce time to market through faster Cypress test execution, ensuring quality releases and accelerated digital transformation. With LambdaTest, developers and testers can perform both real time and automation testing across 3000+ environments and real mobile devices.
LambdaTest Cypress CLI is the perfect tool to perform parallel testing across a range of browsers and platform combinations. You can run the tests in parallel without changing a single line of code logic. LambdaTest Cypress CLI is easy to set up and lets you run Cypress on LambdaTest Grid without any additional configuration.
Best Practices For Cypress
1.Use data-* attributes
To make your selectors easier to maintain and less likely to break, use data-* attributes to give them context and separate them from changes made to the CSS or JavaScript code. This means creating selectors that are specific to testing, which reduces the risk of your test suite failing due to a minor update to your CSS or JavaScript.
Avoid targeting elements based on CSS attributes such as id, class, or tag because they may change over time and cause your tests to fail. Also, don’t target elements that may change their textContent. Instead, use data-* attributes to identify elements because they are less likely to change and make it easier to target them.
2.Do not wait for arbitrary time periods using cy.wait(timeout)
Some developers use the cy.wait(timeout) command to make their scripts wait for the API to return results after page actions such as visiting a URL or saving, updating, or deleting content. However, this approach is not recommended because it can cause unnecessary delays, especially when the page loads quickly.
Instead, a better approach is to use cy.intercept() to create a dynamic wait code. This means setting up an interception for a specific API and then using cy.wait() to pause script execution until the API’s results are received. The advantage of dynamic wait code is that it speeds up the script execution and reduces waiting time.
3.Add a baseUrl in your configuration
When writing Cypress tests, it is important to set the login page as the base URL of the application in all spec files. Setting a baseUrl in your Cypress configuration file can help you avoid hard-coding URLs and easily switch between domains. By adding a baseUrl, you can use commands like cy.visit() and cy.request() with shortened URLs, like ‘index.html’, instead of fully qualified domain names.
Some programmers hard-code the base URL using “cy.visit()” in the “before()” block of each spec file, but this approach is not recommended because it can cause the page to load twice and create a delay.
A better approach is to set the base URL in the “cypress.json” file, which avoids this issue. By setting the base URL in the “cypress.json” file, you can use “cy.visit()” with a relative URL like “/login” instead of the full URL, which simplifies your code and makes it more professional.
This not only saves time during test startup but also avoids a reload that can happen when your tests start running. With a baseUrl, Cypress loads the main window at the specified URL as soon as your tests start and displays an error message if the server is not running at the specified baseUrl.
4.Avoid using single assertions
When writing end-to-end tests with Cypress, it’s better to avoid using a single assertion. While this approach may work fine for unit testing, it’s not recommended for E2E tests.
Instead, you should break down your assertions into multiple test phases to make it easier to identify which specific assertions failed.
5.Each test should be able to run independently
When writing tests, each test should be independent and able to pass on its own. To check if your tests are coupled incorrectly or relying on the state of a previous test, change it to it.only and refresh the browser. If the test can run and pass on its own, then it’s a good test. If it fails, you need to change your approach.
To solve this problem, you can move repeated code from previous tests to before or beforeEach hooks or combine multiple tests into one larger test.
Conclusion
Writing effective tests is not just about verifying that your application works as intended. It’s also about identifying and preventing bugs before they can impact your users. With Cypress, you can build comprehensive, end-to-end tests that ensure your application is performing as expected at all times. Cypress testing offers a comprehensive solution for end-to-end testing.
We’ve only covered the basics of Cypress here. We provided a quick introduction to Cypress and how to set it up, write, and run your first test and its best practices. However, we have much more to explore regarding Cypress testing, which we will cover in our upcoming articles.
Continue Reading:
What are Progressive Web Apps and Why Should You Care?
Web Application Firewall (WAF) vs Network Firewall : Know the difference
ABOUT THE AUTHOR
IPwithease is aimed at sharing knowledge across varied domains like Network, Security, Virtualization, Software, Wireless, etc.


