Table of Contents
Privacy and security have become crucial considerations for internet users in the modern era of technology. With the increasing number of cyber-crimes and surveillance activities, it’s crucial to take measures to protect your online identity and browsing activities. One effective solution is to set up a Virtual Private Network (VPN). In this comprehensive guide, we will walk you through the step-by-step process of setting up a VPN on various devices, ensuring your online privacy and anonymity.
What is a VPN?
Before diving into the setup process, let’s first understand what a VPN is and why it’s important. A Virtual Private Network (VPN) is a service that establishes a protected and encrypted link connecting your device to the internet. It allows you to browse the web anonymously by masking your IP address and encrypting your internet traffic, making it virtually impossible for anyone to intercept or track your online activities.
Using a VPN has several benefits like enhanced security, bypassing geo-restrictions, secured public wi-fi etc.
Setting Up a VPN
Now that we understand the benefits of using a VPN, let’s move on to the step-by-step setup process for different devices.
How to Set Up a VPN on a PC
Establishing a VPN on your PC is a simple procedure. Follow these steps to get started:
- Download a VPN App: Visit the Windows Store or the website of your chosen VPN service provider and download their VPN app.
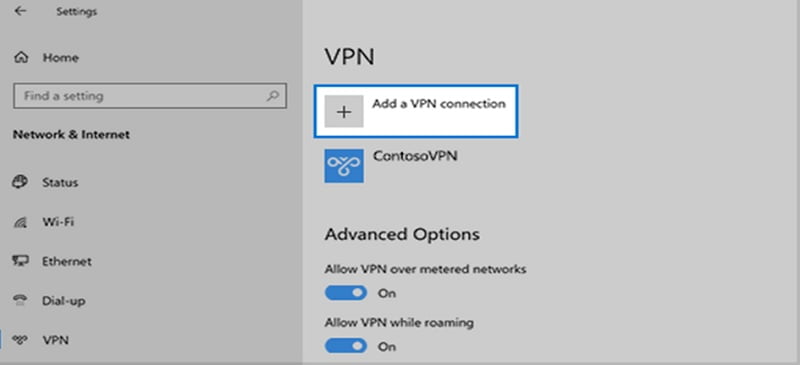
- Navigate to Network Settings: Open the “Settings” menu on your PC and click on “Network & Internet.”
- Add a VPN: Select the “VPN” tab and click on “Add a VPN connection.”
- Configure VPN Settings: Fill in the required fields, including “Server Name,” “VPN Type,” and your account information provided by your VPN provider.
- Save Your VPN: Once you’ve entered the necessary information, click on “Save” to create your VPN connection.
- Connect to VPN: Go back to the “VPN” tab, select your newly added VPN account, and click on “Connect” to establish a secure connection.
How to Set Up a VPN on a Mac
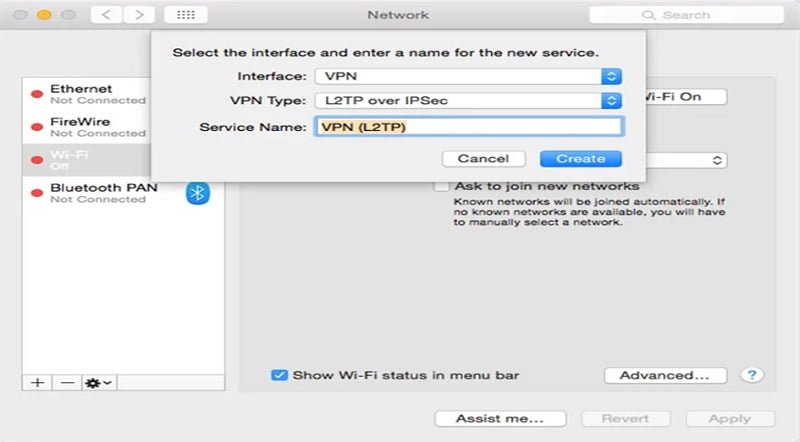
Mac users can also easily set up a VPN on their devices. Here’s how:
- Download a VPN App: Visit the App Store or the website of your chosen VPN service provider and download their VPN app.
- Access Network Settings: Open “System Preferences” on your Mac and click on “Network.”
- Add a VPN Connection: Click on the “+” button at the bottom left corner of the Network settings window and select your VPN from the dropdown menu.
- Configure VPN Details: Enter the required information for your chosen VPN, including “VPN Type” and “Service Name.”
- Create a New VPN Network: Click on “Create” to set up a new VPN network. Fill in the asked details like “Server Address,” “Remote ID,” and “Local ID” provided by your VPN provider.
- Authentication Settings: Navigate to “Authentication Settings” and add your username and password for the VPN connection.
- Connect to VPN: Click “OK” to save your VPN settings, and then click “Connect” to establish a connection to the VPN server.
How to Set Up a VPN on an Android Device
Android smartphones and tablets can also benefit from the added security of a VPN. Steps to set up a VPN on your Android device are as follows:
- Download a VPN App: Visit the Google Play Store or the website of your chosen VPN service provider and download their VPN app.
- Access Network Settings: Open the “Settings” app on your Android device and navigate to “Network & Internet.”
- Configure VPN Settings: Select the “Advanced” option and then click on “VPN.” Tap on the “+” button to add a new VPN connection.
- Enter VPN Details: Fill in the “Name” and “Server” fields with the information provided by your VPN provider. Save the settings.
- Account and Password: Click on your newly added VPN profile and enter your account and password details. Click on the “Connect” button to establish a secure connection with the VPN.
How to Set Up a VPN on an iPhone or iPad
iOS users can also ensure their online privacy by setting up a VPN on their iPhone or iPad. Here’s how:
- Download a VPN App: Visit the App Store or the website of your chosen VPN service provider and download their VPN app.
- Access General Settings: Open the “Settings” app on your iOS device and scroll down to find “General.”
- Add VPN Configuration: Tap on “VPN” and then select “Add VPN Configuration.”
- Configure VPN Type: Choose the correct VPN protocol from the provided options and enter the details of your VPN server, including the “Description,” “Server,” “Account,” and “Password.”
- Activate VPN: Once you’ve entered all the necessary details, tap “Done” to save the VPN configuration. Toggle the VPN switch to “On” to activate the VPN connection.
How to Set Up a VPN on Your Router
Setting up a VPN on your router allows you to protect all devices connected to your network. While the process may vary slightly depending on your router model, here are the general steps to follow:
- Access Router Settings: Open a web browser and enter your router’s IP address in the address bar. Log in to the admin panel using the provided credentials.
- Find VPN Settings: Locate the VPN settings in your router’s admin panel. Look for an option related to VPN client setup, not VPN server setup.
- Enter VPN Details: Enter the required VPN settings provided by your VPN service provider. This may include the server address, authentication details, and encryption settings.
- Additional Steps: Depending on your router, there may be additional steps required to complete the VPN setup process. Follow any on-screen instructions or consult your router’s documentation for specific guidance.
Setting up a VPN on your router ensures that all devices connected to your network benefit from the VPN’s privacy and security features.
Final Step: Check Your VPN Connection
Once you’ve set up your VPN, it’s important to verify that it’s working correctly. Here’s how you can check your VPN connection:
- Check Your IP Address: Before connecting to your VPN server, go to a search engine and type “what is my IP” to find out your current IP address. Note it down.
- Connect to VPN: Connect to your VPN server using the steps outlined in the previous sections.
- Check Your IP Address Again: After connecting to the VPN server, perform another search for “what is my IP.” Compare the new IP address with the one you noted down earlier. If they are different, it means your VPN is working correctly, and your internet traffic is now routed through the VPN server.
Congratulations! You have successfully set up a VPN and ensured that your online activities are secure and private.
Final Words
In conclusion, setting up a VPN on your devices is a crucial step towards safeguarding your online privacy and security. Whether you’re using a PC, Mac, Android device, or iOS device, the process is relatively straightforward. By following the step-by-step instructions provided in this guide, you can establish a secure and encrypted connection, ensuring that your online activities remain private and anonymous.
Remember to choose a reliable VPN service provider that suits your needs and provides excellent customer support. Stay safe, protect your privacy, and enjoy the benefits of a VPN-enabled online experience.
Continue Reading:
Troubleshooting IPSEC Site to Site VPN
VPN vs Proxy: Detailed Comparison
ABOUT THE AUTHOR

You can learn more about her on her linkedin profile – Rashmi Bhardwaj

