Google ADs
Table of Contents
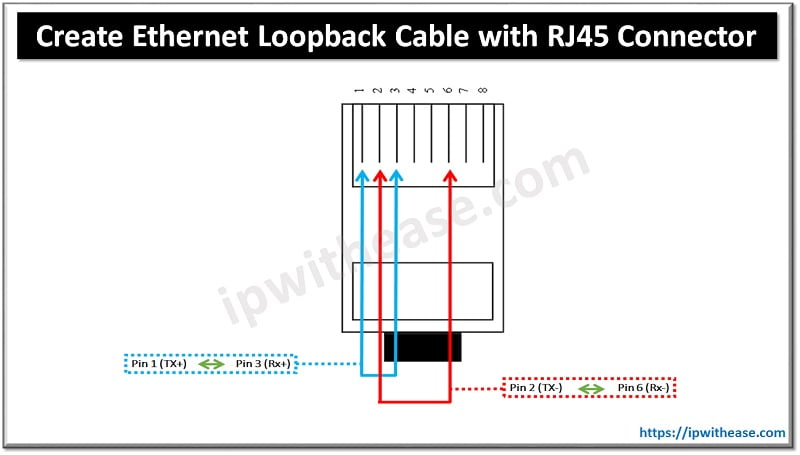
This article will help us with a small hardware testing tool which helps verify whether the interface port is working or not. The small testing tool is an RJ45 based Ethernet Loopback Testing tool which can be created within minutes by connecting wires as per defined below.

RJ45 Ethernet Loopback Tester tool: Hardware Prerequisites
Before that, following are the hardware requirements to make Ethernet Loopback Tester tool
- Cat5 or Cat6 Cable
- Crimping tool
- Cutter
- RJ-45 Connector
Step 1
Remove the jacket of CAT5/6 Cable and cut out one pair (2 Wires) of approx. 4-5 inch length from a total of 4 pairs.Step 2
Follow below pin connectivity –Pin 1 <-> Pin 3
Pin 2 <-> Pin 6
Step 3
Crimp the wires in RJ-45 connector through Crimping Tool.Verification
Once the Ethernet Loopback testing tool is ready, let’s verify Ethernet ports on Cisco hardware –
Google ADs
Step 1
1st, issue “show interface” command to verify the Ethernet port status. By default the interface output should be – “interface is up and line protocol is down”Step 2
Next, insert the RJ45 testing tool into interface to be verifiedStep 3
Finally, issue command “show interface” to verify Ethernet port status. The expected output is –“Interface is up and line protocol is down”If the above output is not received, i.e. up/up status, this confirms the interface hardware is malfunctioning.
Related Blogs –
ABOUT THE AUTHOR

Founder of AAR TECHNOSOLUTIONS, Rashmi is an evangelist for IT and technology. With more than 12 years in the IT ecosystem, she has been supporting multi domain functions across IT & consultancy services, in addition to Technical content making.
You can learn more about her on her linkedin profile – Rashmi Bhardwaj


