Table of Contents
What is Switch Stacking?
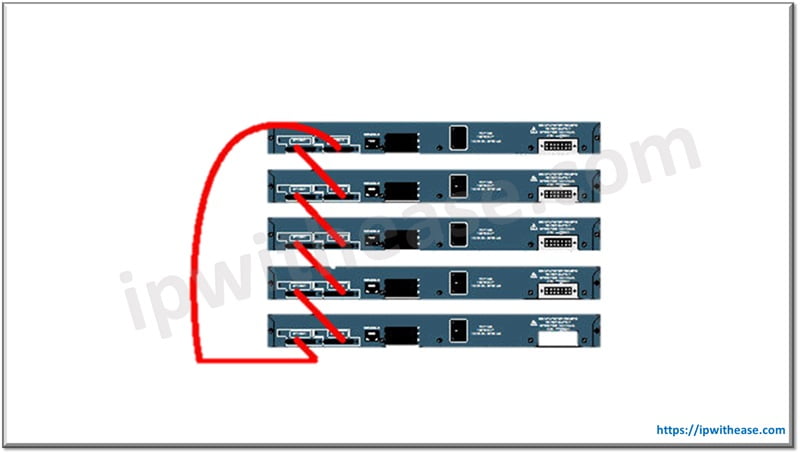
Switch stacking is a feature of certain Cisco access layer switches which allows for the creation of a single logical device from many individual devices via a backside stack port connected by several stack cables. Stackable switches logically to become one switch.
Benefits of Switch Stacking
The major benefits of stacking have been enlisted below –
- Provides a single management interface for multiple units.
- Mitigates Spanning tree issues between switches.
- High performance and high bandwidth due to port bundling
- Uplink and downlink resiliency via Multichassis port bundling
- Power-sharing across switch members.
- Improved backplane capacity
- Mitigation of single point of failure and faster convergence with the removal of FHRP and STP protocols.
The diagram below is an example to show how stacking takes place with multiple switches –
Steps to Configure the Switches in the Stack
- Power up the switch which you want should be the master.
- Attach the stacking cable to the rest of the members.
- Power up the members one at a time and based on the order of your choice.
- Example, if switch 2 is the 2nd switch, then power this switch after the master has been powered up and stacking cable has been applied. This is followed by switch 3, switch 4, etc.
Points to remember
- Ensure all switches are running the same IOS version, same Feature Set (example IP Base).
- Once all switches are up, ensure you enable “switch n priority XX“.
Priority value in the switch stack determines which switch will become the master. A higher priority value for a stack member increases the probability of it being elected active switch and retaining its stack member number. The priority value can be 1 to 15. The default priority value is 1.
If priority value is a tie a switch with lower MAC address is elected as active after the current active switch fails.
Another thing to note is the stack member number ‘n’ based on which the switches in the stack get their port naming convention. The stack member number (1 to 9) identifies each member in the switch stacking.
When a switch joins a switch stacking it takes the next lowest switch stacking member number.
Switch Stacking: Example Scenario
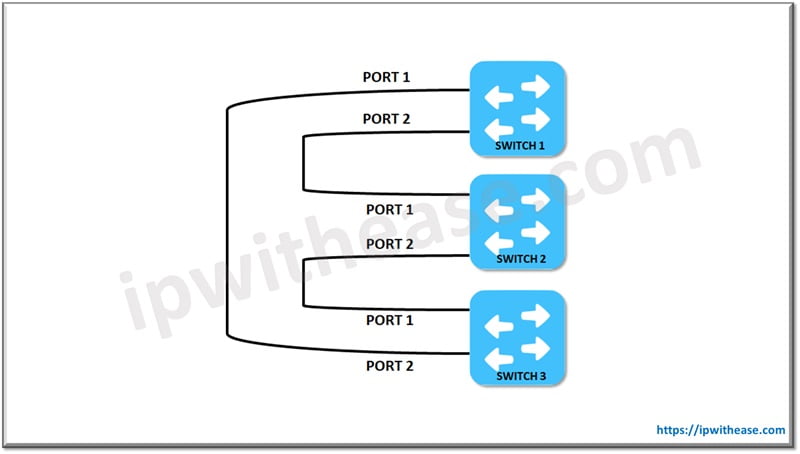
- Switch 1 is powered on to make it as active. Switch 1 takes the stack member number 1 and ports are numbered based on this stack member number.
- Then Switch 2 is powered on and it takes the switch stack member number 2 and then power on Switch 3 which will take switch stack member number 3.
- You can check the switch stack member number using the command show switch.
- Now from the active switch issue below command to assign priority values to the switches in the stack:
switch stack-member-number priority new-priority-number
Example
switch 1 priority 15
switch 2 priority 14
switch 3 priority 13
Example outputs:
SW01#sh switch
Switch/Stack Mac Address : 2c5a.0ff5.1000 – Local Mac Address
Mac persistency wait time: Indefinite

H/W   Current

Switch#   Role           Mac Address         Priority   Version     State

——————————————————————

*1              Active        f80b.cb4d.e000     15             V04           Ready

2               Standby     002c.c8fa.a580     14             V04            Ready

3               Member    2c5a.0ff5.1000       13             V04            Ready
SW01#sh switch detail
Switch/Stack Mac Address : 2c5a.0ff5.1000 – Local Mac Address
Mac persistency wait time: Indefinite

H/W   Current

Switch#   Role           Mac Address         Priority   Version     State

————————————————————————-

*1              Active        f80b.cb4d.e000     15             V04           Ready

2               Standby     002c.c8fa.a580     14             V04            Ready

3               Member    2c5a.0ff5.1000       13             V04            Ready
Drawbacks of Switch Stacking
Switch stacking can be beneficial for network management and scalability, but it also has some disadvantages. Here are some potential drawbacks:
- Single Point of Failure: If the master switch in the stack fails, it can cause the entire stack to become unstable or even go down, affecting all the devices connected to the switches in the stack.
- Complexity in Management: Managing a stack of switches can be more complex compared to managing individual switches. Firmware upgrades, configuration changes, and troubleshooting can become more complicated.
- Cost: Switches that support stacking are often more expensive than non-stacking switches. Additionally, specialized stacking cables and modules can add to the cost.
- Bandwidth Bottlenecks: The stack’s backplane bandwidth may become a bottleneck if the inter-switch communication exceeds its capacity, potentially reducing overall network performance.
- Configuration Limitations: Some network configurations or features might not be fully supported in a stacked environment, limiting flexibility in certain network designs.
- Dependency on Specific Models: Stacking typically requires switches of the same model or at least the same manufacturer, limiting flexibility in mixing different types or brands of switches.
- Power Consumption and Heat: Stacked switches may consume more power and generate more heat, necessitating better cooling and power management solutions.
- Scalability Limits: There is usually a maximum number of switches that can be stacked together, which can limit scalability if more ports are needed in the future.
- Firmware and Software Compatibility: All switches in the stack must run compatible firmware versions, which can complicate upgrades and maintenance, especially in a diverse network environment.
- Learning Curve: Network administrators may need additional training to effectively manage and troubleshoot stacked switch configurations, which can be a challenge for teams used to managing standalone switches.
While switch stacking can offer significant benefits in terms of simplified management and improved performance, these disadvantages should be carefully considered in the context of your specific network requirements and environment.
ABOUT THE AUTHOR

You can learn more about her on her linkedin profile – Rashmi Bhardwaj

