Table of Contents
Introduction to vManage
vManage is responsible for collecting network telemetry from our vEdge devices and alerting on events and outages in the SD-WAN environment. Device Templates and overlay traffic engineering policies created by REST API and shared on vSmart Controller to apply on edge devices. Deployments of vManage can be hosted on either ESXi or KVM hypervisors, with a minimum of 16 vCPUs, 32GB of dedicated RAM and 500GB of storage.
Step 1. Deploy virtual machine for vManage.
Step 2. Bootstrap and configure vManage controller.
Step 3. Set the organization name and vBond address in vManage.
Step 4. Install the root CA certificate.
Step 5. Generate and install the certificate onto the vManage controller.
Step 1: Deploy vManage Virtual Appliance image on VMware ESXi or KVM hypervisors
- After installing the OVA, right-click on the virtual machine and select Edit Settings.
- Click on Add button, select Hard Disk, and click
- Select Create a new virtual disk, click Next, and set the size to at least 100 GB. Click Next until you are back to the Virtual Machine Properties Click OK.
- Once you are finished, power up the virtual machine.
Step 2: Bootstrap and Configure vManage Controller
Now that the vManage virtual machine is properly configured and powered up, the network administrator can begin to configure basic settings. Open the VMware console for this virtual machine and (once the system prompts you for a login) enter the default username and password of admin. Upon initial login, you will be prompted to format the virtual disk that was just added. Select the disk and type yes to format it. Depending on the size of this virtual disk, it could take some time. Once this process completes, the system will reboot automatically.
Step 3/4: Basic Configuration of vManage and Install certificate
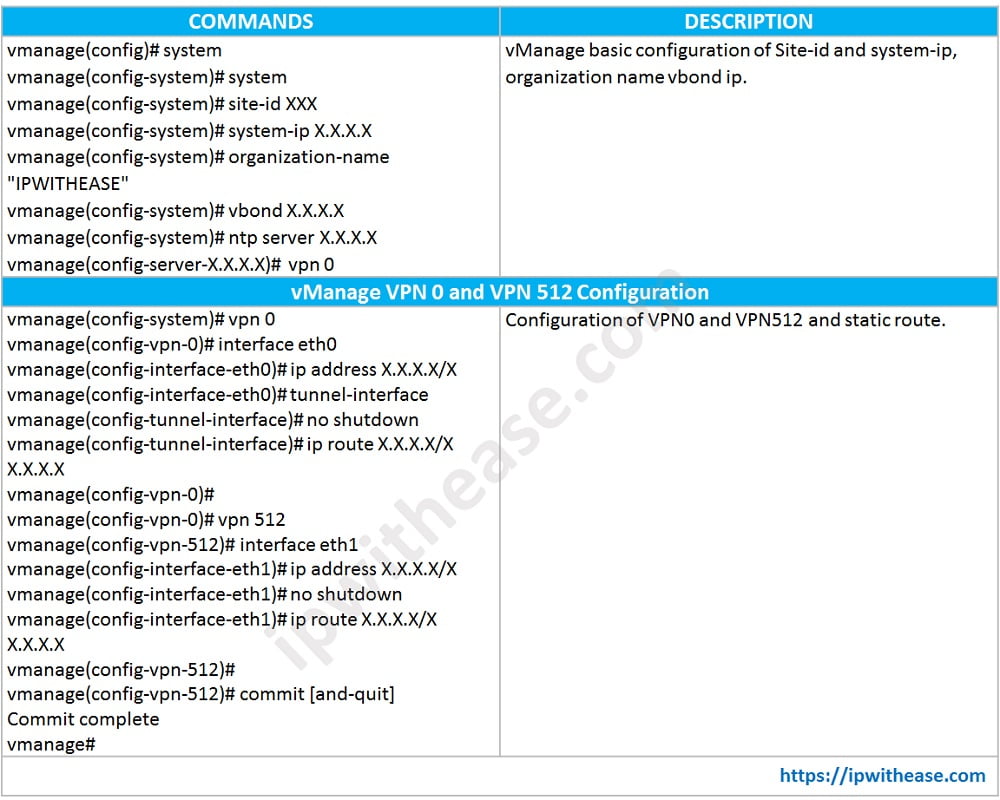
Now that the virtual disk is formatted, you can begin to apply the initial bootstrap configuration.
The initial configuration must contain the following information:
- Organization name
- System IP
- Address of the vBond controller
- Site ID
- IP address for VPN 0
- (Optional) an address for VPN 512
- (Optional) NTP server
vManage Basic Configuration

- Connect to the VPN 512 IP address via a web browser and log in with the username of admin and a password of admin. Once you’re logged in, the system presents you with a dashboard.
- From the menu bar on the left of the screen, click the Administration icon and select Settings
- On the page that follows, navigate to the Organization Name, vBond address, and the Controller Certificate Authorization Click on each of these items and select Edit.
- The last step that needs to be done is to change the Controller Certificate Authorization Click Edit and select enterprise CA. In the box that appears, you can either upload or paste in the root CA certificate file. You might need to obtain this file from your enterprise PKI administrator. Option to set the CSR properties for all CSR requests by selecting Set CSR Properties.
Step 5: Generate and Install Certificate onto vManage Controller
The final step is to generate the certificates that will be used for vManage controller authentication.
- Browse to the Devices Configuration section. From here, select Certificates.
- From here, you can see additional information about the vManage controller. Note the Certificate Status From this screen we can also regenerate a CSR and install a certificate. Since the CSR is automatically generated by vManage, we’ll download and have the enterprise CA sign it. From there, we’ll install the signed certificate into the controller. To download the CSR, click the ellipsis to the far right for the respective controller.
- Select View CSR. From here, the CSR is displayed and you have the option to copy or download the text. Copy or download this file and submit to your Enterprise PKI administrator. Once this CSR has been submitted and signed by the enterprise CA, we can continue with installation.
- Once the certificate has been generated and signed by the root CA, you can install the certificate into the controller. In the right-hand corner of the main screen, locate the button that says Install certificate. From here, you are prompted to either paste the contents of or upload the certificate. Click Install.
- At this point, a status window appears allowing you to track the progress of certificate installation. The final output should display Success.
Continue Reading:
Cisco SD-WAN Template: Configuration & Deployment
Cisco Viptela Network Interfaces
ABOUT THE AUTHOR

You can learn more about her on her linkedin profile – Rashmi Bhardwaj


