Cisco Zone Based Firewall
Cisco Zone based firewall configuration is an inbuilt feature on Cisco IOS routers used for security purpose. In ZBF we create different zones and then assign different interfaces in the zones. Once the interfaces are assigned to a zone then we create security policies to allow/deny traffic between different zones. To create a security policy for traffic between zones we have to create a zone pair. We have to configure zone pairs ourselves and apply a security policy to them to determine what traffic is permitted from one zone firewall to another. All security policies are attached to the zone pairs.
Related- Firewall Security Zones
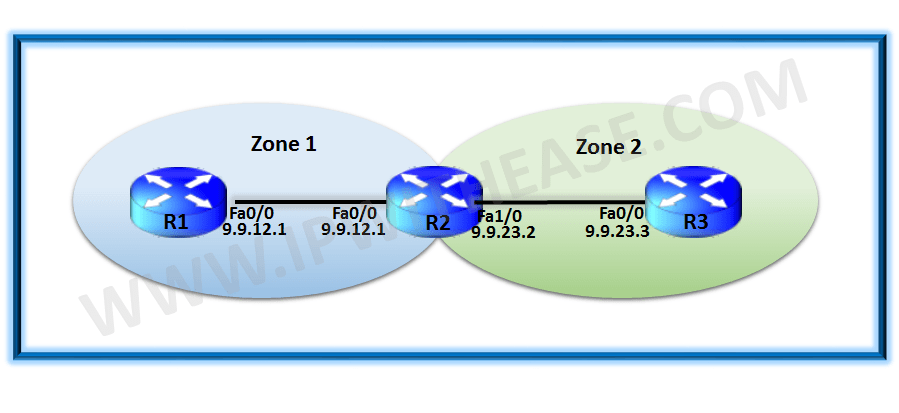
Let us use a simple topology below to Configure ZBF on Cisco IOS Routers –

Related: Zone based firewall
Configuration
First of all we configure the routing on R1 and R3 as below:
R3(config)#ip route 0.0.0.0 0.0.0.0 9.9.23.2
Next we create two zones Zone_1 and Zone_2 on R2 which will act as our ZBF:
R2(config)#zone security Zone_2
Next we assign the interface to correct zone
R2(config-if)#zone-member security Zone_1
R2(config)#interface fastEthernet 1/0
R2(config-if)#zone-member security Zone_2
Next we configure the Zone pairs
R2(config-sec-zone-pair)#description Zone_1_to_Zone_2 traffic
R2(config)#zone-pair security Zone_2_to_Zone_1 source Zone_2 destination Zone_1
R2(config-sec-zone-pair)#description Zone_2_to_Zone_1 traffic
Now we have the ZBF enabled and by default all traffic is denied.
Type escape sequence to abort.
Sending 5, 100-byte ICMP Echos to 9.9.23.3, timeout is 2 seconds:
…..
Success rate is 0 percent (0/5)
Our packets are dropped as the default behaviour is to block all traffic between the zones.
Next step is to define the security policies which have three options:
Pass: traffic is permitted.
Drop: traffic is dropped.
Inspect: traffic is permitted and inspected so that return traffic is allowed.
Let us create a simple security policy to allow the ICMP traffic:
R2(config-cmap)#match protocol icmp
R2(config)#policy-map type inspect Zone_1_to_Zone_2
R2(config-pmap)#class type inspect ICMP
R2(config-pmap-c)#inspect
Note we have used inspect under policy-map which will allow the traffic to flow in both directions i.e. Zone_1 to Zone_2 and vice versa.
The policy-map is finally applied on the zone-pair created earlier:
R2(config-sec-zone-pair)#service-policy type inspect Zone_1_to_Zone_2
Verification
Now we see the traffic for ICMP/ping is allowed between R1 and R3
Type escape sequence to abort.
Sending 5, 100-byte ICMP Echos to 9.9.23.3, timeout is 2 seconds:
!!!!!
Success rate is 100 percent (5/5), round-trip min/avg/max = 8/10/12 ms
Related- Firewall vs Router
Related- Palo Alto Firewall Interview Questions
ABOUT THE AUTHOR

You can learn more about her on her linkedin profile – Rashmi Bhardwaj


