Table of Contents
To upgrade from EVE-NG Community to EVE-NG Professional, purchase a Pro license from the EVE-NG website and download the Pro image. Then, deploy the Pro image as a new VM and migrate your labs and configurations from the Community edition.
Introduction to Eve-ng
EVE-ng the emulated virtual environment for networks, developers and Devops is ready to go IT solution. It permits enterprises, e-learning providers and centers, individual and group collaborators for creating virtual proof of concepts, solutions and trainings, it empowers clientless multivendor network emulation environment and facilitates options to recreate or simulate real production environment and perform the testing which you would not otherwise think of doing it as it is too risky to touch real network.
EVE-ng helps in learning and training on new technologies including cisco, Juniper, and lot of other vendor products like checkpoint, F5 etc. It helps to design and construct networks, according to requirements and validate right design to have right solution in place. With no risk easily and quickly actual environment can be recreated/simulated for testing, and it also supports multivendor interactions.
Features of Eve-ng
Some of the key features of EVE-ng are:
- KVM Hardware acceleration
- Import/export of configurations
- Labs XML file formats
- Memory optimization
- CPU watchdog
- Full HTML5 support interface
- Multiuser support
- Interaction with real network (Fully supported)
- Simultaneously multiple lab instances
It comes in 2 editions – Community edition and professional edition and professional edition has add on features like – 1024 node support per lab, Docker container support, Clientless EVE management, Lab timer for self-training, Multi-configuration for single lab, Dynamic console porting, import / export configurations from EVE to local PC to/fro etc.
Today we will learn how do we upgrade eve-ng or downgrade, what steps are involved, what are the pre-requisites etc.
Upgrade EVE-ng Community edition to EVE-ng professional
Mandatory pre-requisites:
- Internet must be reachable from your PC and Vmware
- DNS must work properly and name resolution happening correctly
- Enough Hard disk space should be available
- Root partition should have atleast 10GB free space and boot partition must be 50MB
Note: Take backup of all labs especially if customized templates and settings are used.
cd /opt/unetlab ; tar -czvf /root/labs-backup.tgz labsUpdate Steps
Step 1: Free / clear older packages from EVE
apt autoremoveStep 2: ensure to have free space on EVE Hard disk, to verify same issue command vg-root and /boot should not be 100% or close to it.
Df-h
Step 3: verify named based ping. e.g. www.yahoo.com if you get ping response it is ok to proceed else check DNS IP assignment for EVE

Step 4: execute command
Apt updateAnd when it prompts to confirm, answer “Y”
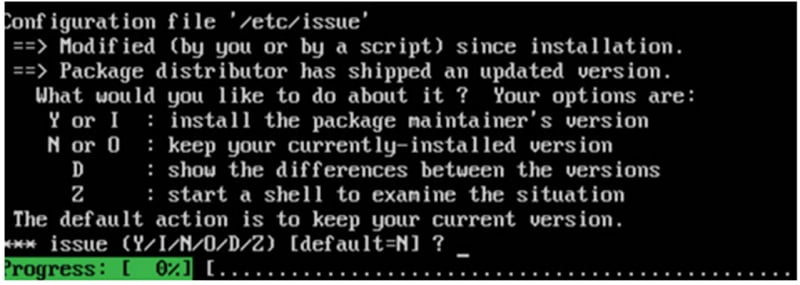
When installation proceeds it may ask few more inputs related to configuration. Reply “N” for below as you are upgrading to newer version and it is asking to keep your current version.

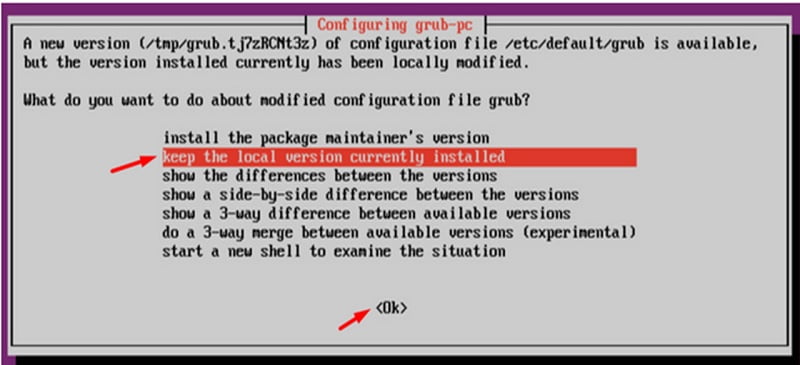
Keep local version currently installed and Press “Y” to confirm

After installation is successfully complete reboot the EVE.
Downgrade EVE-ng
To rollback EVE-ng professional edition to EVE community issue the below commands from CLI of EVE.
- Echo “drop database guacdb;” | mysql -u root –password=eve-ng mysql
- apt update
- apt install eve-ng-guacamole
- apt install –reinstall eve-ng-guacamole
- apt install eve-ng
- Systemctl disable docker
- Systemctl disable docker.service
- Systemctl stop docker.service
- Systemctl disable udhcpd
Next Step: reboot EVE
rebootWhen you reboot you will get a warning that all your multi configuration sets for labs will be lost and only initial configuration will be retained so backup all devices configuration before proceeding with rollback
FAQs Related to Eve-ng
What do you mean by eve upgrade?
EVE Upgrade increases the maximum EVE capacity of the player.
How can I expand space in the EVE?
To expand space of the EVE, add a new HDD. Do not expand current HDD.
Is Eve-ng free?
Eve-ng community is free of cost. However, Eve-ng professional edition is paid.
Continue Reading
Top 5 Network Simulation Tools
ABOUT THE AUTHOR

You can learn more about her on her linkedin profile – Rashmi Bhardwaj


