Cisco ASA Transparent Mode –
Network and Security administrators working on new setup or migration of applications/services may face the challenge of configuring Cisco ASA in a transparent mode in order to have minimal design changes and to meet some key Business requirements like support for non-IP traffic, minimal change to IP address structure and Routing etc.
This article will help understand the Transparent Mode in cisco ASA Firewall and how to configure the same.
1st let’s understand what we are getting out by using Firewall in Transparent mode :
Benefits of Using a Firewall in Transparent Mode –
- No change to existing IP addressing or Servers.
- Routing protocols can establish adjacencies through the firewall
- Protocols such as HSRP, VRRP, GLBP can pass.
- Multicast streams can traverse the firewall
- Non-IP traffic can be allowed (IPX, MPLS, BPDUs
Related – ASA Firewall Security Levels
Key Characteristics of ASA Firewall When Configured In Transparent Mode –
- Transparent firewall mode supports only two interfaces (inside and outside)
- The firewall bridges packets from one VLAN to the other instead of routing them.
- MAC lookups are performed instead of routing table lookups.
- Can run in single firewall context or in multiple firewall contexts.
- A management IP address is required on the ASA.
- The management IP address must be in the same subnet as the connected network.
- Each interface of the ASA must be a different VLAN interface.
- Even though the appliance acts as a Layer 2 bridge, Layer 3 traffic cannot pass through the security appliance from a lower security level to a higher security level interface.
- The firewall can allow any traffic through by using normal extended Access Control Lists (ACL).
Related – Configure Multiple Context Mode in Cisco ASA
Features Not Supported by Transparent Mode –
- DHCP relay – The transparent firewall can act as a DHCP server, but it does not support the DHCP relay commands.
- Dynamic routing protocols will not be allowed, however, we can add static routes for traffic originating on the ASA
- Multicast IP routing
- QoS
- VPN termination – The transparent firewall supports site-to-site VPN tunnels for management connections only and not for non-management connections.
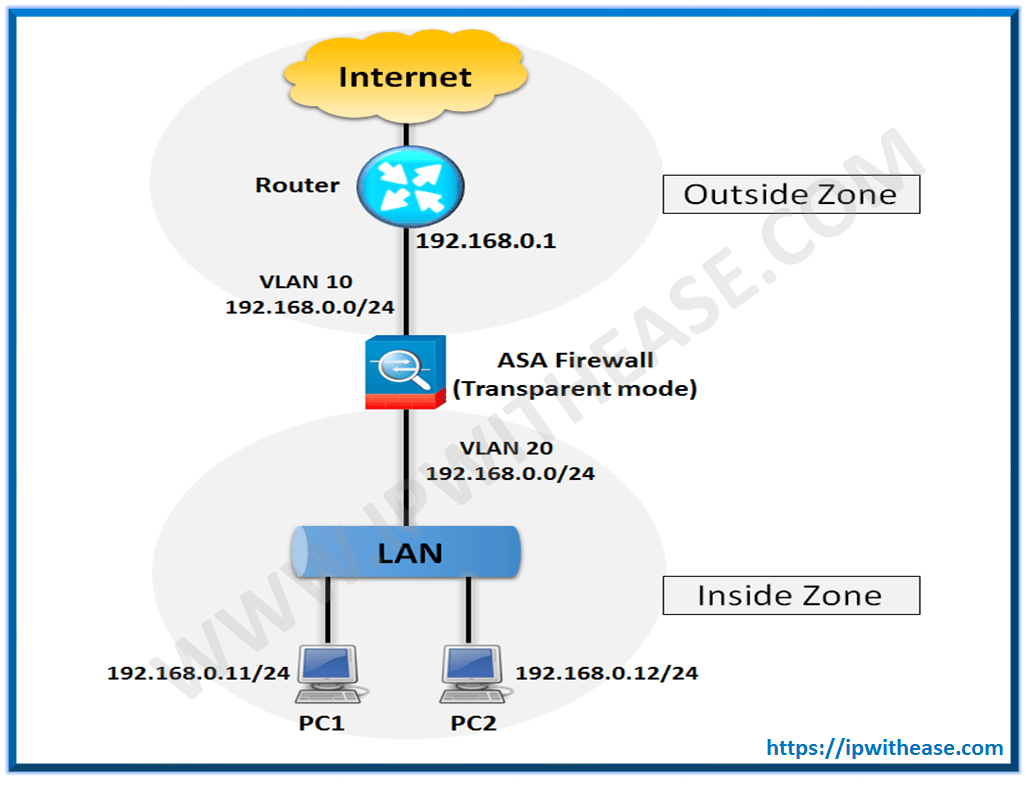
An example will help viewers understand the concept and configuration required in Transparent mode –

The Step by Step configuration of the ASA Firewall is shown below –
Step 1 –
In configuration mode, execute the command firewall transparent:
ASA(config)# firewall transparent
Step 2 –
Next, assign physical interfaces to VLANs using the switchport access command and enable the physical interfaces with the no shutdown command:
ASA(config-if)# switchport access vlan 10
ASA(config-if)# no shutdown
ASA(config-if)# interface Ethernet 0/1
ASA(config-if)# switchport access vlan 20
ASA(config-if)# no shutdown
Step 3 –
After configuring the physical interfaces, you must configure the VLAN interfaces by giving them names and assigning them to the same bridge-group:
ASA(config-if)# nameif outside
INFO: Security level for “outside” set to 0 by default.
ASA(config-if)# bridge-group 1
ASA(config-if)# interface vlan 20
ASA(config-if)# nameif inside
INFO: Security level for “inside” set to 100 by default.
ASA(config-if)# bridge-group 1
Step 4 –
Now, you’ll configure the management IP address through the Bridge Virtual Interface (BVI):
ASA(config-if)# ip address 192.168.0.10
Related – Cisco ASA Firewall Interview Questions
ABOUT THE AUTHOR

You can learn more about her on her linkedin profile – Rashmi Bhardwaj


