DNS Configuration in Palo Alto Firewall
The DNS Sinkhole concept allows the Palo Alto firewall to falsify DNS response to a DNS query for a suspicious domain and cause the suspicious/infected domain name to resolve to a defined IP address (Sinkhole IP) that give response on behalf of destination IP address. The assumption is that if source 10.1.1.1 initiate traffic to destination 8.8.8.8 with infected URL (malicious.com), firewall redirect infected traffic to DNS Sinkhole IP address (10.11.12.13) and stops suspicious traffic towards next-hop immediately.
How to configure DNS Sinkhole in Palo Alto Firewall
To configure DNS Sinkhole feature in firewall below pre-requisites needs to be followed
- DNS Sinkhole IP address must be UNIQUE and does not exist anywhere inside network.
- Anti-virus and Wildfire must be updated as malicious traffic is scanned according to latest anti-virus signature patterns which increases the success rate to infected links and avoid false positive case.
- Create Firewall policy with “Deny” action
- Policy must have logging enabled as to verify session hits to DNS Sinkhole IP address
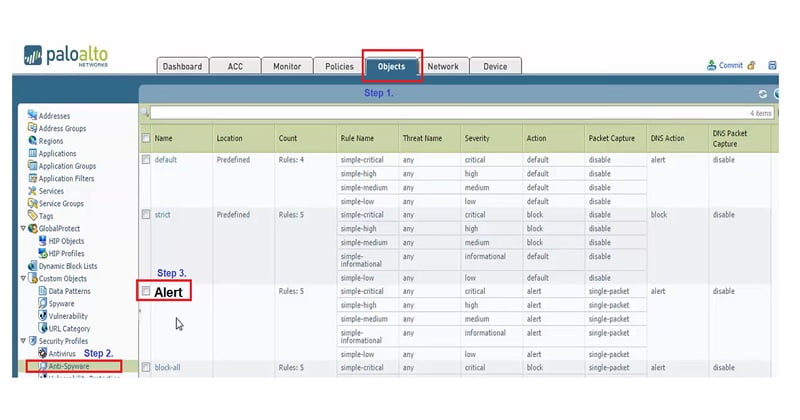
Step 1. Go to Object
Step 2. Select anti-spyware profile.
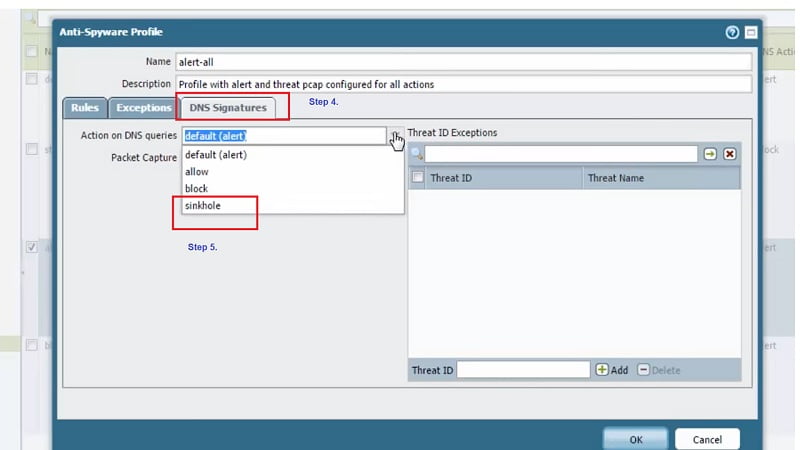
Step 3. Under anti-spyware profile you need to create new profile. Here we have created profile with name “Alert”
Step 4. Select DNS Signatures,
Step 5. Inside DNS Signatures you see Action on DNS queries, select option sinkhole
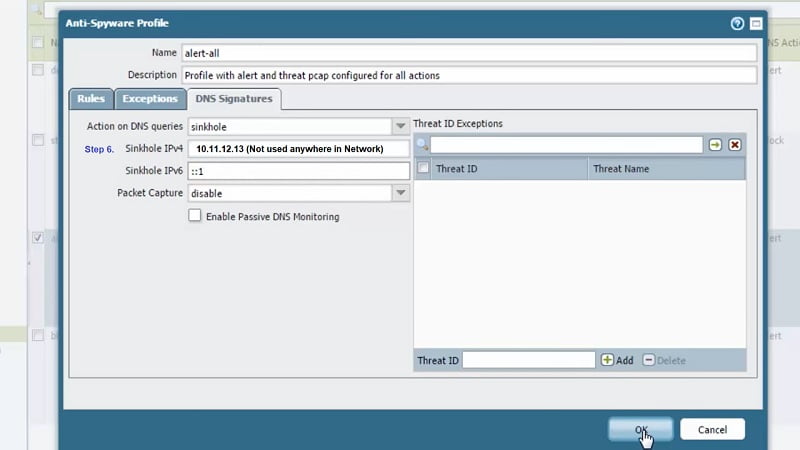
Step 6. Then we need to choose IPV4 address for DNS Sinkhole (IP-10.11.12.13), here we should be very careful as DNS Sinkhole IP address must be fictitious/fake IP that cannot exist anywhere inside your network. It must be unique and un-used.
The DNS and HTTP traffic must travel through firewall in order to detect malicious URL and then stop access to fake IP.
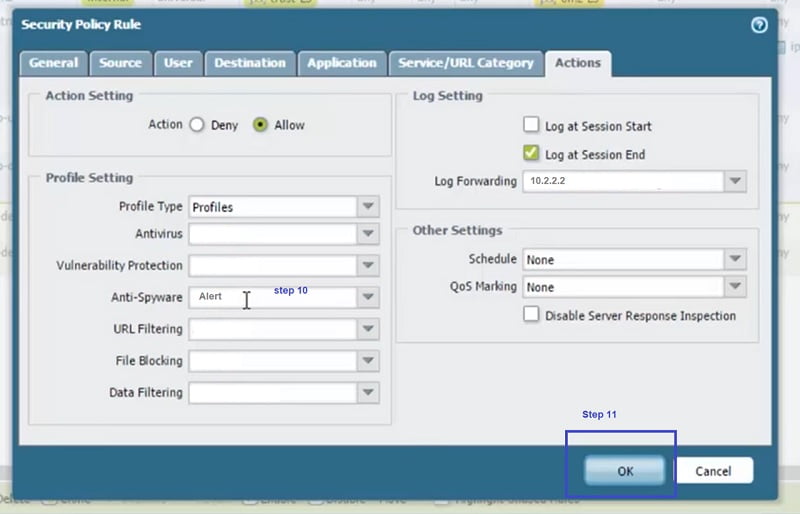
Next, we require to place anti-spyware profile named as Alert in Internet policy
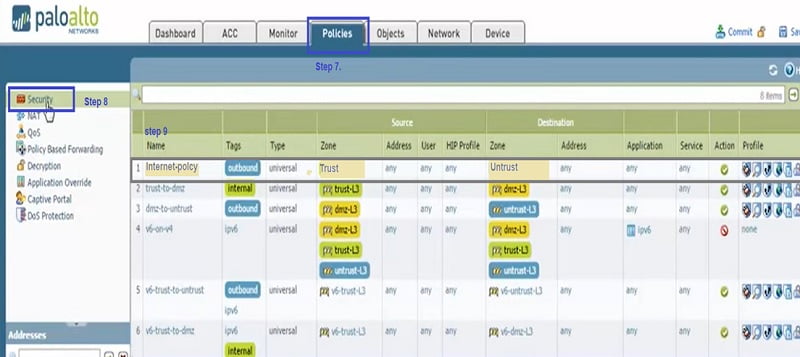
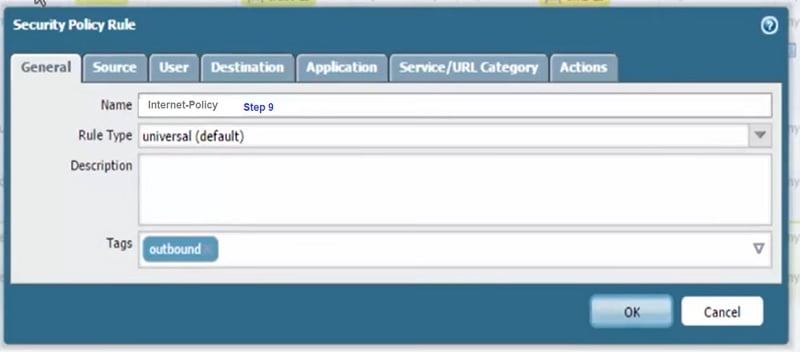
Step 7 to Step 11
So now, go to Policy-> Security->Trust (Internet-Policy) ->it’s a outbound rule to any application with anti-spyware profile “Alert”, same profile which is created above.
Step 12. Create another rule for DNS-Sinkhole traffic.
This is again from zone Trust to Untrust with action “Deny” for destination IP address 10.11.12.13
Once you commit the change, you are done!!!
Policy 1 DNS-Sinkhole-Policy
Source Address ->10.1.1.1 (user machine’s address)
Source Zone ->Trust
Destination Address ->10.11.12.13 (DNS-Sinkhole IP)
Destination Zone ->DMZ
Profile ->Alert (anti-spyware Profile)
Action ->Deny
Policy 2 Internet-Policy
Source Address ->10.1.1.1 (user machine’s address)
Source Zone ->Trust
Destination Address ->Any
Destination Zone ->Untrust
Profile ->Alert (anti-spyware Profile)
Action ->Allow


Summary of DNS-Sinkhole configuration
- The malicious DNS request is captured by firewall,
- Firewall block the connection and send back reply to user with fake (DNS-Sinkhole IP) in DNS request.
- User gets the DNS Sinkhole fake IP address in DNS response.
- User traffic is redirected to DNS-Sinkhole IP address which is blocked by firewall policy and user gets request-time-out OR webpage is not working prompt on the screen.
How to verify DNS sinkhole
Once any suspicious request captured in firewall log, a threat alert is generated .
So here, we have suspicious URL www.suspicious-site-hacker.com which is a known malicious site.
Access to site will not work as it redirects to sinkhole Fake IP address.
Source Address ->10.1.1.1 (user machine’s IP address )
Destination Address -> www.suspicious-site-hacker.com
DNS-Sinkhole IP address -> 10.11.12.13
Action ->Deny
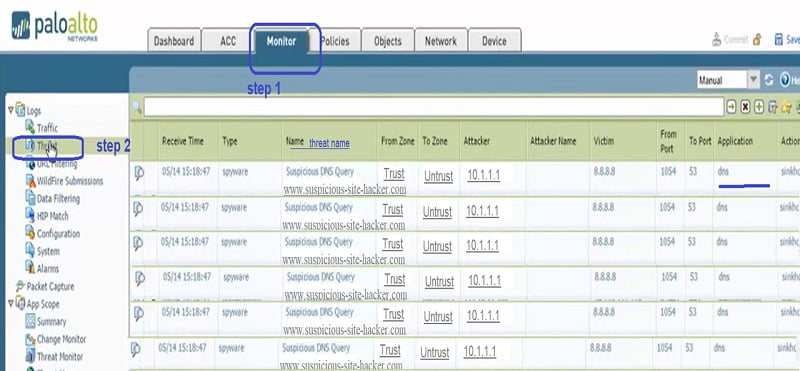
Step 1. Go to Monitor Tab
Step 2. Select Threat option. Threat for URL www.suspicious-site-hacker.com is captured by firewall for destination to public DNS and source 10.1.1.1.
Step 3. We can check traffic for DNS sinkhole IP address 10.11.12.13 in traffic logs
Step 4. Go to monitor ->Traffic
Step 5. Select destination address filter for DNS Sinkhole IP-10.11.12.13, traffic is being denied by Block-DNS-Sinkhole policy.


I hope description of DNS Sinkhole configuration and verification helps you to understand this awesome Palo Alto Firewall feature.
Continue Reading:
DMZ Cisco ASA Configuration to Inside Zone and Internet Zone Communication
ABOUT THE AUTHOR

You can learn more about her on her linkedin profile – Rashmi Bhardwaj

